To use Backup Exec 2010 R3 IDR, you have to
install the “Intelligent Disaster Recovery” option during installing Backup
Exec 2010 R3.

After installing Backup Exec 2010 R3, you
need to run the full backup of the servers in which you want to use IDR.
Prerequisites
Assuming that the server was back up.
Creating IDR bootable image
1. At the backup server, launch "Backup Exec 2010 R3".
2. On the menu, click "Tools > Wizards > Intelligent Disaster Recovery Preparation Wizard".

3. At welcome screen, check "Choose a media server that has the IDR option installed", click "Next".
4. Enter the "User name", "Password" and "Domain" for the Media Server.

5. Click "Next".
6. Select "Bootable CD IMAGE for use with CD Writers (ISO 9660)".

7. Click "Next" twice.
8. Select the server you want to create the bootable image for.
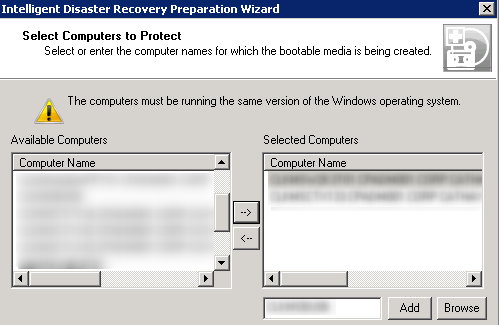
Remark: You cannot select different OS in the "Selected Computers".
Example: WS1 was installed Windows Server 2008. WS2 was installed Windows Server 2003. You cannot select them in the "Selected Computers".
9. Click "Next".
10. Enter the path to store the CD image.

11. Click "Next".
12. Then you have to provide the windows operating installation files.

Remark: If you want to restore Windows Server 2003 OS, you have to provide Windows server 2003 installation files for creating CD image.
13. Click "Next".

The bootable CD image is being created.
14. When the CD image was created, click "Next".
15. Click "Finish".
Restoring Windows operating system by IDR
Prerequisites
The bare computer should be assigned the same hard disk size as the backup one.
Lab
1. At a bare computer, insert IDR bootable image.
2. Boot up the computer.
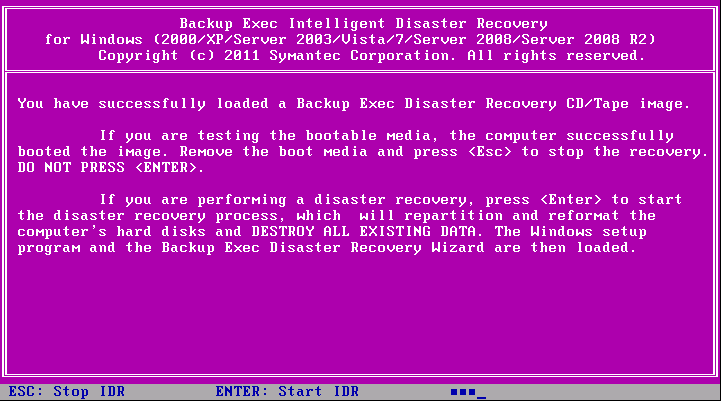
3. Press [Enter].
4. At welcome screen, select "Automated Recovery".

5. Click "Next".
6. At "SCSI, RAID, and USB Controllers Discovery", you can update the driver.

7. I don't need to update the driver, click "Next".
8. At "Select Recovery File", you can select the "Recovery File".

Remark: By default, the bootable CD image was copied the latest DR file.
9. Click "Next".

10. Click "OK" to format the hard disk.
11. Click "Next" twice.
12. At "Select Restore Method" screen, select "Install networking, and then restore from a remote media server".

13. Click "Next".
14. At "Network Configuration" screen, select "Local Area Connection".

15. Click "Configure".
16. Select "Internet Protocol (TCP/IP)", click "Properties".
17. You have to enter the same IP address settings of the server back up as before.

18. Click "OK".
19. Click "Close".
20. Click "Next".
21. At "Connect to Media Server" screen, enter the "Server name with domain name", "Domain Name", "User Name" and "Password".

Remark: If the server isn't typed with domain name, you may not contact the media server.
22. Click "Next".
23. Check the options you want to select.

24. Click "Next".
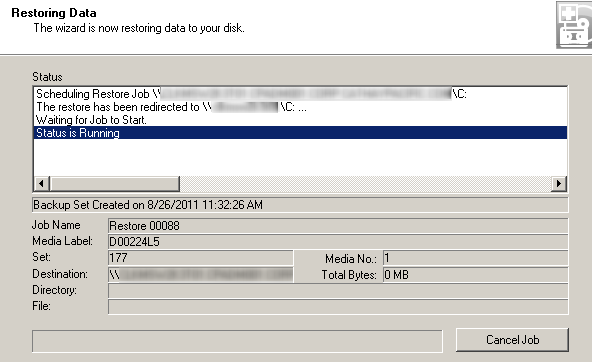
The data is being restored.
25. When restoration finished, click "No".

26. After restoring Windows Server 2003 operating system, you need to provide some Hotfixes for the OS.

Remark: If you don't provide the Hotfixes for the OS, the operating system can't start.
27. Provide the Hotfixes for the OS, click "OK".

28. Click "Finish".
As a result, the full backup was restored to a bare computer.
This posting is provided “AS IS” with no warranties, and confers no rights!
This posting is provided “AS IS” with no warranties, and confers no rights!
No comments:
Post a Comment