Sunday, July 31, 2011

Installing Additional Domain Controller by using IFM for Windows Server 2003 and Windows Server 2003 R2

Promoting an additional domain controller, Install from Media (IFM) can reduce the replication traffic which is initiated during the installation of and additional domain controller in an Active Directory domain. this method is best for WAN link unstable environment.

To promote an R2 domain controller, the backup must be taken from the Windows Server 2003 with SP2 domain controller, or from the Windows Server 2003 R2 domain controller. If you try to promote an R2 domain controller with media from an SP1 domain controller, you will receive the following error message:

The operation failed because: Active Directory could not be restored, because the backup files were taken on a different build of the operating system.

Preparing the IFM
1. At a Windows Server 2003 domain controller which is installed global catalog service, log in as Domain Administrator.
2. Launch "Ntbackup".


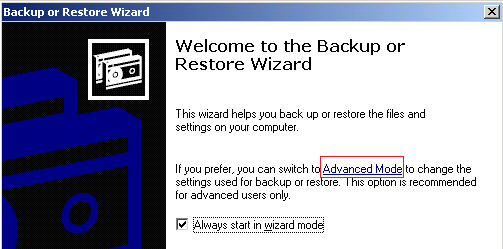
3. Click "Advanced Mode".
4. Select "Backup" tab, check "System State".
5. Next to "Backup media or file name", type "C:\IFM.bkf".


6. Click "Start Backup" twice.
7. When the backup is complete, click "Close".
8. Click "Ntbackup".


Prompting an additional domain controller by IFM
1. At the server which you want to dcpromo, log in as local administrator.
2. Copy the "IFM.bkf" to this server C drive.
3. Launch "Ntbackup".
4. Click "Advanced Mode".
5. Select "Restore and Manage Media" tab.


6. Right-click "File", select "Catalog file".
7. Select the "IFM.bkf", click "OK".
8. Expand "File > IFM.bkf created <date> at <time>, check "System State".


9. Next to "Restore files to", select "Alternate location".
10. Next to "Alternate location", type "C:\IFM".


11. Click "Start Restore".


12. Click "OK" twice.
13. When the restore is complete, click "Close".
14. Close "Ntbackup".
15. Click "Start > Run", enter "dcpromo /adv".
16. At welcome screen, click "Next" twice.
17. Select "Additional domain controller for an existing domain".


18. Click "Next".
19. At "Copying Domain Information" window, select "From these restored backup files".
20. Type "C:\IFM".


21. Click "Next".
22. Enter the domain administrator credential, click "Next" three times.
23. Enter the DSRM password, click "Next" twice.


As a result, the required data are being replicating from the media file.
Remark: The lifetime of the IFM is 60 days.

Reference:
Installing a Domain Controller in an Existing Domain using restored backup media
http://technet.microsoft.com/en-us/library/cc779518(WS.10).aspx

This posting is provided “AS IS” with no warranties, and confers no rights!

Disabling the Knowledge Consistency Checker (KCC) from automatically creating replication topology for a site

The Knowledge Consistency Checker (KCC) is a component that automatically generates and maintains the intra-site and inter-site replication topology. You can disable the KCC's automatic generation of intra-site or inter-site topology management, or both.

Intra-site link connection

Inter-site link connection

Prerequisites
At Windows Server 2003 domain controller, you have to install the support tools kit.


Lab environment
Computer FQDN: DC11.contoso.com
IP /Network / Site: 192.168.1.11/24 HKG
Roles: Domain Controller, DNS Server
Operating System: Windows Server 2008 Enterprise 64 bit
Inter-Site link: HKG-TYO

Computer FQDN: DC21.contoso.com
IP /Network / Site: 192.168.1.12/24 HKG
Roles: Domain Controller, DNS Server
Operating System: Windows Server 2008 Enterprise 64 bit
Inter-Site link: HKG-TYO

Computer FQDN: DC02.contoso.com
IP /Network / Site: 192.168.2.11/24 TYO
Roles: Domain Controller, DNS Server
Operating System: Windows Server 2008 Enterprise 64 bit
Inter-Site link: HKG-TYO


Disabling intra-site automatic generation
1. At DC11, log in as Domain Administrator.
2. Launch "Command Prompt".
3. Enter "repadmin /siteoptions".


By default, KCC's automatic generation was enabled.

4. Enter the following command to disable intra-site automatic generation of HKG:

repadmin /siteoptions /site:HKG +IS_AUTO_TOPOLOGY_DISABLED


Now, intra-site automatic generation of HKG was disabled.

Remark: "repadmin /siteoptions /site:HKG +IS_AUTO_TOPOLOGY_DISABLED" affects all domain controllers in HKG site.

Test result
1. Still in DC11, launch "Active Directory Sites and Services".
2. Expand "Sites > HKG > Servers > DC11 > NTDS Settings".


3. At right pane, delete "<automatically generated>".
4. Go to "Command Prompt", enter "repadmin /kcc %computername%".


"repadmin /kcc" is applied to force the Knowledge Consistency Checker (KCC) on each targeted domain controller to immediately recalculate the inbound replication topology.

5. Back to "Active Directory Sites and Services", refresh "NTDS Settings" of DC11.


KCC doesn't generate the intra-site connection in DC11.

6. To restore the setting, go to "Command Prompt", enter "repadmin /siteoptions /site:HKG -IS_AUTO_TOPOLOGY_DISABLED".


7. Enter "repadmin /kcc %computername%".
8. Back to "Active Directory Sites and Services", refresh "NTDS Settings" of DC11.


As a result, the intra-site automatic generation of HKG was enabled.


Disabling inter-site automatic generation
1. At DC02, log in as Domain Administrator.
2. Launch "Command Prompt".
3. Enter "repadmin /siteoptions".


4. Enter the following command to disable inter-site automatic generation of TYO:

repadmin /siteoptions /site:TYO +IS_INTER_SITE_AUTO_TOPOLOGY_DISABLED


Now, inter-site automatic generation of TYO was disabled.

Remark: "repadmin /siteoptions /site:TYO +IS_INTER_SITE_AUTO_TOPOLOGY_DISABLED" affects all domain controllers in TYO site.

Test result
1. Still in DC02, launch "Active Directory Sites and Services".
2. Expand "Sites > TYO > Servers > DC02 > NTDS Settings".


3. At right pane, delete "<automatically generated>".
4. Go to "Command Prompt", enter "repadmin /kcc %computername%".


5. Back to "Active Directory Sites and Services", refresh "NTDS Settings" of "DC02".


KCC doesn't generate the inter-site connection in DC02.

6. To restore the setting, go to "Command Prompt", enter "repadmin /siteoptions /site:TYO -IS_INTER_SITE_AUTO_TOPOLOGY_DISABLED".


7. Enter "repadmin /kcc %computername%".
8. Back to "Active Directory Sites and Services", refresh "NTDS Settings" of DC02.


As a result, the inter-site automatic generation of TYO was enabled.

Remark: To disable intra and inter-site automatic generation, you can enter the following command:

repadmin /siteoptions /site:<site name> +IS_INTER_SITE_AUTO_TOPOLOGY_DISABLED +IS_TO_TOPOLOGY_DISABLED


Remark: You should create the intra or inter-site connection before disabling KCC's automatic generation.

You can modify the KCC's automatic generation by ADSI Edit.

1. At a domain controller, log in as Domain Administrator.
2. Launch "ADSI Edit".
3. Right-click "ADSI Edit", select "Connect to".
4. Next to "Select a well known Naming Context", select "Configuration".


5. Click "OK".
6. Expand "Configuration > CN=Configuration,DC=<Domain Name>,DC=com > CN=Sites > CN=<Site Name>".


7. At right pane, right-click "CN=NTDS Site Settings", select "Properties".
8. Next to "options".


9. Click "Edit".
10. In the "Values" box, type the appropriate value:
  • To disable automatic intra-site topology generation, use value 1 (decimal).
  • To disable automatic inter-site topology generation, use value 16 (decimal).
  • To disable both intra-site and inter-site topology generation, use value 17 (decimal).
11. Type "1", click "OK".


12. Click "OK".
13. Close "ADSI Edit".

Reference:

How to disable the Knowledge Consistency Checker from automatically creating replication topology

Repadmin for Experts
http://technet.microsoft.com/en-us/library/cc811549(WS.10).aspx

This posting is provided “AS IS” with no warranties, and confers no rights!

Wednesday, July 27, 2011

How to read the result of repadmin /replsummary

Repadmin helps administrators diagnose Active Directory replication problems between domain controllers running Microsoft Windows operation systems.

You can use Repadmin to view the replication topology, as seen from the perspective of each domain controller.

In addition, you can use Repadmin to manually create the replication topology, to force replication events between domain controllers. You can also use Repadmin to monitor the relative health of an Active Directory Domain Services (AD DS) forest.

1. On a domain controller, log in as Domain Administrator.
2. Launch "Command Prompt".
3. Enter "repadmin /replsummary".


The Active Directory replication information was displayed.

By default, the replication model is pull-based in Active Directory, so you should focus on the destination domain controller first.

In the above picture, each dot after the first three represents a domain controller. it isn't more than 50 dots per line.

Largest delta denotes the longest replication gap amongst all replication links for a particular domain controller.

Total is the replica links for a particular domain controller (one for each naming context on each domain controller). Please note that this is not the connection objects or replication partners per domain controller. I will enter the other command to show it.

Fail is the total number of replica links failing to replicate for one reason or the other. This will never be greater than the Total field.

Percentage is the percentage of failures in relation to the total replica links on the domain controller.

Now, we don't know the replication information of the current domain controller. I have to enter the following command:

4. Enter "repadmin /replsummary %computername%".


Now, the current domain controller is DC11 and it pulls the replication information from other source DCs.

5. I want to get the replication information of  DC04, enter "repadmin /replsummary dc04".


The replication information of dc04 pulls from DC11.

6. Enter "repadmin /showrepl dc04" to show the total replication link.


There are 5 replica links for replication. In DC11, there are 45 replica links because it needs to pull all other domain controllers.


To use "repadmin /showrepl", you can verify the largest delta.


The time replsummary taken was 22:08:33. Now,  if you look at the schema naming context replication time, 22:00:44 , the difference is about 7m:, which relates to the largest delta.

I hope I can help you to understand the "repadmin /replsummary" easily.

Reference:
http://technet.microsoft.com/en-us/library/cc811556(WS.10).aspx

This posting is provided “AS IS” with no warranties, and confers no rights!

Thursday, July 7, 2011

Exchange 2010 Remote Management Shell

Remote Shell in Microsoft Exchange Server 2010 enables you to manage your server running Exchange 2010 from a remote computer, either on your network or from the Internet. A User must be enabled for remote shell before the user can user it.

Prerequisites
Install Windows Management Framework: Windows Management Framework contains Windows PowerShell and WinRM.

Join your computer to a Windows domain: If you want to user your current network credentials, the domain you're joined to must be trusted by the domain where the Exchange server resides. Your domain doesn't need to be trusted if you manually specify credentials that are valid in the remote domain.

Open TCP port 80: TCP port 80 must be open between your computer and the remote Exchange 2010 server, and the port must be allowed through Windows Firewall on the Exchange 2010 server.

Use the Shell to enable remote shell for a user
To enable remote shell for a user, you need to enable the feature by Exchange PowerShell.

1. At Exchange Server, log in as Domain Administrator.
2. Launch "Exchange Management Shell".
3. Enter the following cmdlet to enable remote shell for a user:

Set-User <User Name> -RemotePowerShellEnabled $True


Remark: By default, all users are enabled remote shell.

Modify the Execution Policy
1. At a domain workstation, log in as Domain Administrator.
2. Launch "Windows PowerShell".
3. Enter the following cmdlet to check the Execution Policy of Windows PowerShell:

Get-ExecutionPolicy


By default, the Execution Policy of Windows PowerShell is "Restricted".

4. Enter the following cmdlet to modify Execution Policy to "RemoteSigned".

Set-ExecutionPolicy RemoteSigned


Using current credential connents to a remote Exchange 2010 server
1. At PowerShell, enter the following cmdlet to open the connection:

$Session = New-PSSession -ConfigurationName Microsoft.Exchange -ConnectionUri http://<fqdn of Exchange 2010 server>/PowerShell. -Authentication Kerberos


Remark: The "ConnectionUri" also supports https address, but the server must be installed the certificate which is assigned by trusted certification authority.

2. Enter the following cmdlet to import the server-side PowerShell session:

Import-PSSession $Session


Now, you can perform Exchange cmdlets in this PowerShell session.


Remark: If the Execution Policy doesn't change to "RemoteSigned", when you perform "Import-PSSession $Session", you will get the following error.


3. To disconnect the remote session, enter the following cmdlet:

Remove-PSSession $Session


Using the other user credential connents to a remote Exchange 2010 server
1. At PowerShell, enter the following cmdlet to insert user credential:

$UserCredential = Get-Credential


2. Enter the domain user name and password.


3. Click "OK".
4. Enter the following cmdlet to open the connection:
$Session = New-PSSession -ConfigurationName Microsoft.Exchange -ConnectionUri http://<fqdn of Exchange 2010 server>/PowerShell. -Authentication Kerberos -Credential $UserCredential


5. Enter the following cmdlet to import the server-side PowerShell session:

Import-PSSession $Session

References
Connect Remote Exchange Management Shell to an Exchange Server

Troubleshooting the Exchange Management Shell

Enable Remote Exchange Management Shell for a User

Disconnect Remote Exchange Management Shell from an Exchange Server
http://technet.microsoft.com/en-us/library/dd335206.aspx

This posting is provided “AS IS” with no warranties, and confers no rights!