Thursday, January 30, 2014

Migrate a generation 1 virtual machine to a generation 2 virtual machine in Hyper-V 2012 R2 environment

In Windows Sever 2012 R2, Microsoft introduced a new generation version of virtual machine. It is generation 2 virtual machine. Generation 2 virtual machine supports Windows 8, Windows Server 2012, Windows 8.1 and Windows Server 2012 R2. John Howard, Senior Program Manager in Hyper-V Team of Microsoft, wrote a series of Hyper-V generation 2 virtual machines to talk about all the thing in generation 2 virtual machines and He also wrote a PowerShell script, Convert-VMGeneration, to convert a generation 1 virtual machine to a generation 2 virtual machine. Basically, administrators cannot convert a generation 1 virtual machine to a generation 2 virtual machine directly. However, we can following the steps which are provided by John Howard to migrate a generation 1 virtual machine to a generation 2 virtual machine or using a PowerSehll script, Convert-VMGeneration, to do that.

Before you migrate a generation 1 virtual machine to a generation 2 virtual machine, there are some limitation that we should be aware.
  • Script requirement: It must run on Windows 8.1 or Windows Server 2012 R2 with Hyper-V feature
  • Supported Operating System: Windows 8 (64-bit editions), Windows 8.1 (64-bit editions), Windows Server 2012 and Windows Server 2012 R2
  • Items in a generation 1 virtual machine will not be migrated to a generation 2 virtual machine: Checkpoints (Snapshots), additional data partitions on the source boot disk, Floppy, physical DVD drivers.
  • Non accepted scenario: The virtual machine is running, Hyper-V replica is enabled on a virtual machine, Dual boot virtual machine configuration


Goal 
Using "Convert-VMGeneration" converts a Windows Server 2012 R2 from generation 1 to generation 2.

Prerequisites
  • 1 Hyper-V host named HV02 which is installed Windows Server 2012 R2
  • 1 Windows Server 2012 R2 generation 1 virtual machine named W2012R2
  • Download and save Convert-VMGeneration script at C:\Script in HV02
  • Backup a current virtual machine before perform Convert-VMGeneration (Suggested by John Howard)
Lab
1. On W2012R2 and then log in Local Administrator.
2. Launch "Command Prompt" as administrator. 
3. Perform "reagentc /disable" to disable Windows Recovery Environment (RE).


4. Shut down W2012R2.
5. On HV02, launch "PowerShell" as administrator.
6. Navigate to "C:\Script".
7. Perform ".\Convert-VMGeneration.ps1 -VMName W2012R2 -Path E:\" to convert W2012R2 to a generation 2 virtual machine.


8. Enter "Y".


The virtual machine is converting.


As a result, W2012R2 has been converted to a generation 2 virtual machine.


More information:


This posting is provided “AS IS” with no warranties, and confers no rights!

Tuesday, January 28, 2014

Update the Windows Time Service settings of domain member servers in Hyper-V virtual machine

Normally, Windows Time service of domain member servers synchronizes a domain controller in domain environment. However, domain member servers are under virtual machine environment (Hyper-V). Virtual machines synchronize them time with the Hyper-V host server because the "Time synchronization" of "Integration Services" is enabled in virtual machines.


To verify the setting, we can log in as local administrator of a domain member server and then perform the "w32tm /query /source".


Now, the domain member server is synchronizing the time with the Hyper-V host server.

According "Time Synchronization in Hyper-V", the "Time synchronization" of "Integration Services" should be enabled in virtual machines. However, administrators can update the registry in virtual machines to stop W32Time from using the Hyper-V time synchronization integration service for moment-to-moment synchronization.

Goal
  • Update the Windows Time Service in a domain member server, TM01, to synchronize a domain controller
Lab

1. On TM01, log in as Local Administrator.
2. Launch "Registry Editor".
3. Navigate to "HKEY_LOCAL_MACHINE\SYSTEM\CurrentControlSet\Services\W32Time\TimeProviders\VMICTimeProvider".
4. On right pane, double-click "Enabled".


5. Next to "Value data", change to "0".


6. Click "OK".


7. Close "Registry Editor".
8. Launch "Command Prompt" as administrator.
9. Perform "w32tm /config /syncfromflags:domhier /update" to update the setting to synchronize the time with a domain controller.


10. Perform "net stop w32time & net start w32time" to restart the Windows Time service.


11. Perform "w32tm /resync /force" to force synchronization.


12. Perform "w32tm /query /source" to verify the result.


As a result, the domain member server which is a virtual machine synchronize the time with a domain controller.

More information:

This posting is provided “AS IS” with no warranties, and confers no rights!

Monday, January 27, 2014

Migrate a Windows Server 2008 or R2 Remote Desktop Gateway server to a Windows Server 2012 or R2 server in workgroup enviornment - Part 3

In part 1 and part 2, we migrated the associated users, groups and policies from the Remote Desktop Gateway server, RDG08, to RDG12. In this part, we are going to migrate the certificate of Remote Desktop Gateway server to RDG12.

Goal
  • Migrate local users accounts of groups which are associated with Remote Desktop Gateway server in the existing Remote Desktop Gateway server to Windows Server 2012 R2 environment
  • Migrate the Remote Desktop connection authorization policies and Remote Desktop resource authorization policies from the existing Remote Desktop Gateway server to Windows Server 2012 R2
  • Export and import the certificate of Remote Desktop Gateway server from the existing one to Windows Server 2012 R2
Lab environment
  • 1 Windows Server 2008 R2 with Remote Desktop Gateway named RDG08 in workgroup environment
  • 1 Windows Server 2012 R2 named RDG12 in workgroup environment
  • IP addresses of RDG08 and RDG12 are 10.100.100.2 and 10.100.100.1
Lab
This part is intended to export the certificate from RDG08 and then import it to RDG12.

Export the certificate of Remote Desktop Gateway from RDG08
1. On RDG08, log in as Local Administrator.
2. Launch "Microsoft Management Console".
3. On the menu, click "File > Add/Remove Snap-in".


4. On "Add or Remove Snap-ins" window, double-click "Certificates".


5. On "Certificates snap-in" window, select "Computer account".


6. Click "Next".
7. On "Select Computer" window, click "Finish".


8. On "Add or Remove Snap-ins" window, click "OK".


9. Expand "Certificates (Local Computer) > Personal > Certificates".
10. On right pane, right-click the certificate, select "All Tasks > Export".


11. On "Welcome to the Certificate Export Wizard" window, click "Next".
12. On "Export Private Key" window, select "Yes, export the private key".


13. Click "Next".
14. On "Export File Format" window, under "Personal Information Exchange - PKCS #12 (.PFX)", check "Include all certificates in the certification path of possible" and "Export all extended properties".


15. Click "Next".
16. On "Password" window, provide a password for this certificate.


17. Click "Next".
18. On "File to Export" window, next to "File name", enter "C:\Mig\RDG.pfx".


19. Click "Next".
20. On "Completing the Certificate Export Wizard" window, click "Finish".


21. On "Certificate Export Wizard" window, click "OK".

Import the certificate of Remote Desktop Gateway from RDG12
1. On RDG12, log in as Local Administrator.
2. Launch "Remote Desktop Gateway Manager".
3. Right-click "RDG12 (Local)", select "Properties".


4. On "RDG12 Properties", select "SSL Certificate".


5. Select "Import a certificate into the RD Gateway RDG12 Certificates (Local Computer)/Personal store" and then click "Browse and Import Certificate".


6. On "Open" window, navigate to "\\10.100.100.2\Mig", and then select "RDG".


7. Click "Open".
8. On "Enter Private Key Password" window, enter the password of this certificate.


9. Click "OK".
10. On "Certificate Import" window, click "OK".


11. On "RDG12 Properties", click "OK".


As a result, users can use a new password to connect the Remote Desktop Gateway server, RDG12.


Please go to the following web sites to read the previous of this series.


This posting is provided “AS IS” with no warranties, and confers no rights!

Sunday, January 26, 2014

Migrate a Windows Server 2008 or R2 Remote Desktop Gateway server to a Windows Server 2012 or R2 server in workgroup enviornment - Part 2

In part 1, we migrated the local user accounts and groups from the Remote Desktop Gateway server, RDG08, to RDG12. In this part, we are going to migrate the Remote Desktop Gateway server settings like "Connection Authorization Policies" and "Resource Authorization Policies" from RDG08 to RDG12.

Goal
  • Migrate local user accounts or groups which are associated with Remote Desktop Gateway server in the existing Remote Desktop Gateway server to Windows Server 2012 R2 environment
  • Migrate the Remote Desktop connection authorization policies and Remote Desktop resource authorization policies from the existing Remote Desktop Gateway server to Windows Server 2012 R2
  • Export and import the certificate of Remote Desktop Gateway server from the existing one to Windows Server 2012 R2
Lab environment
  • 1 Windows Server 2008 R2 with Remote Desktop Gateway named RDG08 in workgroup environment
  • 1 Windows Server 2012 R2 named RDG12 in workgroup environment
  • IP addresses of RDG08 and RDG12 are 10.100.100.2 and 10.100.100.1
Lab
This part is intended to migrate "Connection Authorization Policies", "Resource Authorization Policies" from RDG08 to RDG12.

Installing Remote Desktop Gateway in Windows Server 2012 R2
To install Remote Desktop Gateway feature in Windows Server 2012 R2, please follow the steps of "Renaming primary DNS suffix of the server" and "Installing the Remote Desktop Gateway features" on  "Deploy Remote Desktop Gateway in Windows Server 2012 or Windows Server 2012 R2 workgroup environment".

Export and import the Connection Authorization Policies and Resource Authorization Policies
In RDG08, there are 1 "Connection Authorization Policies" and 1 "Resource Authorization Policies" with some settings.


1. On RDG08, log in as Local Administrator.
2. Launch "Remote Desktop Gateway Manager".
3. Right-click "RDG08 (Local)", select "Export policy and configuration settings".


4. On "Export Policy and Server Configuration Settings" window, next to "Location", enter "C:\Mig".


5. Click "OK".
6. On "RD Gateway" windows, click "OK".


The policy settings file has been exported to the Share folder.

7. Go to RDG12, log in as Local Administrator.
8. Launch "Windows Explorer" and navigate to "\\10.100.100.2\Mig".
9. Right-click "tsgateway.xml", select "Open with > Notepad".


The Server name and User group name don't match the new server name, RDG12, so we have to change it from RDG08 to RDG12 before importing the settings.

10. On the menu, click "Edit > Replace".


11. On "Replace" window, next to "Find what", enter "RDG08".
12. Next to "Replace with", enter "RDG12".


13. Click "Replace All".
14. Close the "Replace" window.


Now, the Server name and User group name have been updated.

15. Save and exit "tsgateway.xml".
16. Launch "Remote Desktop Gateway Manager".


There is no "Connection Authorization Policies" and "Resource Authorization Policies" in RDG12.

17. Right-click "RDG12 (Local)", select "Import policy and configuration settings".


18. On "Import Policy and Server Configuration Settings" window, under "Specify the file that you want to import", enter "\\10.100.100.2\Mig\tsgateway.xml".


19. Click "OK".
20. On "RD Gateway" window, click "Yes" to import the settings to RDG12.


21. On "RD Gateway" window, click "OK".


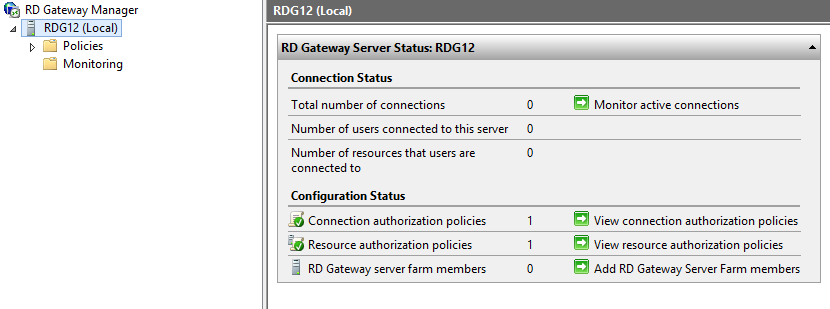
The "Connection Authorization Policies" and "Resource Authorization Policies" settings have been imported in RDG12.


Please go to following web sites to read the other parts of this series.
Migrate a Windows Server 2008 or R2 Remote Desktop Gateway server to a Windows Server 2012 or R2 server in workgroup environment - Part 1

Migrate a Windows Server 2008 or R2 Remote Desktop Gateway server to a Windows Server 2012 or R2 server in workgroup environment - Part 3

This posting is provided “AS IS” with no warranties, and confers no rights!