Thursday, August 28, 2014

Create an event into Event Log by PowerShell

In previous version of Windows, administrators can perform "eventcreate" on "Command Prompt" to create an event into Event Log. Starting from Windows 8 and Windows Server 2012, there are new cmdlets in PowerShell 3.0 for administrators to create an event into Event Log.

To create an event to Event Log, administrators can perform "New-EventLog" and "Write-EventLog".

"New-EventLog" is applied to register a source type of an event.

Administrators can perform the cmdlet like this.

New-EventLog -LogName <Log Type> -Source "<New source name>".


Remark: The source name cannot be duplicated.


Then, administrators can perform "Write-EventLog" to create an event into Event Log.

Administrators can perform the cmdlet like this.

Write-EventLog -LogName <Log Type> -Source <source name> -EntryType <Information, Warning, Error and so on> -EventId <Define by administrators> -Message <The description of this event>


Remark: If the source isn't registered by "New-EventLog", you may get the following error.

Write-EventLog : The source name <Source Name> does not exist on computer.

This posting is provided “AS IS” with no warranties, and confers no rights!

Tuesday, August 26, 2014

Updating your knowledge of Microsoft Licensing 2014

There are 2 courses to talk about the latest licensing schema of Microsoft on Microsoft Virtual Academy. If you are interested in Microsoft licensing, please watch Licensing Programs' Fundamentals and Licensing Windows Server 2012 R2.

This posting is provided “AS IS” with no warranties, and confers no rights!

Wednesday, August 20, 2014

Create a schedule task to run PowerShell script

Nowadays, many administrators write their own PowerShell scripts and perform it in the production environment. Administrators may create a basic task in Task Scheduler to run the PowerShell script for daily operations.

To create a basic task to run the PowerShell script, we can do the following steps.

1. On a server or workstation, log in as Administrator.
2. Launch "Task Scheduler".
3. Next to "Actions" pane, click "Create Basic Task".


4. On "Create a Basic Task" window, enter the name of your task.


5. Click "Next".
6. On "Trigger" window, select the period of your task. In my lab environment, I selected "Daily".


7. Click "Next".
8. On "Daily" window, select the "Start" time of this task.


9. Click "Next".
10. On "Action" window, select "Start a program".


11. Click "Next".
12. On "Start a Program" window, next to "Program/script", enter "PowerShell".
13. Next to "Add arguments (optional)", enter the script path.


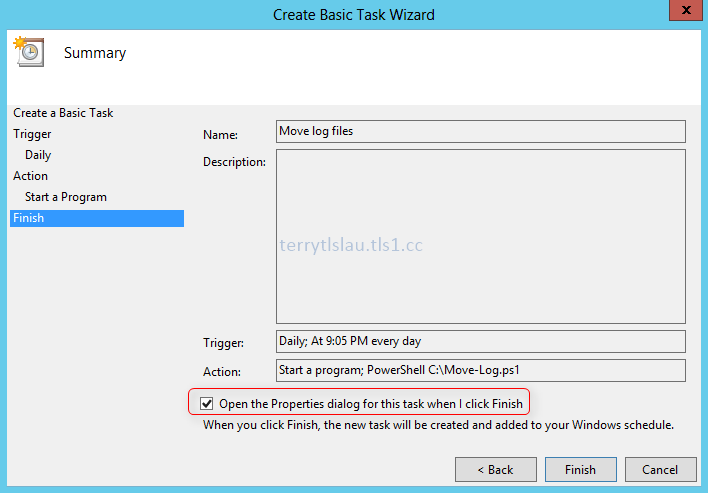
14. Click "Next".
15. Check "Open the Properties dialog for this task when I click Finish" and then click "Finish".


16. On "Move log files Properties" window, we can change to "SYSTEM" account by  entering "SYSTEM" in "Change User or Group".


17. Click "OK" to close "Move log files Properties".


As a result, the schedule task for this PowerShell script was created.

Remark: Before you create the schedule task, you may need to change the "Execution Policy" to "unrestricted" or "RemoteSigned" by performing "Set-ExecutionPolicy".

We can also perform the following cmdlets to create a schedule task in Windows 8, Windows 8.1, Windows Server 2012 and Windows Server 2012 R2.

$Action = New-ScheduledTaskAction -Execute "PowerShell.exe" -Argument "C:\Move-Log.ps1"
$Trigger = New-SchedulesTaskTrigger -Daily -At 1am
$Settings = New-ScheduledTaskSettingsSet
$Task = New-ScheduledTask -Action $Action -Trigger $Trigger -Settings $Settings
Register-ScheduledTask "Move Log File 2" -InputObject $Task -User "NT Authority\SYSTEM"


This posting is provided “AS IS” with no warranties, and confers no rights!

Monday, August 18, 2014

Choose an appropriate Remote Desktop Licensing server for your environment

The latest Windows version can be installed the current and previous Remote Desktop Licensing or Terminal Services Licensing licenses in the server. For an example, Windows Server 2008 R2 can be installed Windows Server 2008 R2 and previous Remote Desktop or Terminal Services licenses in the server. However, Windows Server 2008 R2 cannot be installed Remote Desktop or Terminal Services licenses of Windows Server 2012 later because it cannot support the future version of Windows. To deploy the latest Remote Desktop environment, administrators have to install the latest Windows for Remote Desktop Services Licensing.

For more detail, please read "RDS and TS CAL Interoperability Matrix".

This posting is provided “AS IS” with no warranties, and confers no rights!

Saturday, August 16, 2014

Do you know mimikatz?

mimikatz is a tool which is written by Benjamin Delpy. There are some functions which are provided by mimikatz. mimikatz can easily grab passwords and kerberos TGT from lsass memory. When someone like server administrator or domain administrator logged in and out on a workstation or server which is installed Windows 7, 8, Server 2008, Server 2008 R2 or Server 2012, the user (might be an attacker) who has local administrator right can run mimikatz to grab the password of domain administrator from lsass memory on this workstation or server. 

Remark: mimikatz can grab passwords from a lsass process dump file.

Then, mimikatz also can export and import any kerberos TGT from one user account to another one after a user logged in and out a workstation or server. In the latest version of mimikatz, it can export the non-exportable certificate private key from a computer. It's a fantastic tool for testing and studying.

Using mimikatz to grab password from Windows 8

DISCLAIMER

  • Please do not use this tool in your production environment
  • I do not guarantee the tool will not damage or destroy your system(s) and environment
  • Use this tool at your own risk
  • Make sure you understand the tool before you use it

Download link
mimikatz

How to protect LSA
In Windows 8.1 or Windows Server 2012 R2, Microsoft updated the lsass process to reduce credential theft. When someone used a tool like mimikatz to grab passwords, it just showed the password hashes.

Using mimikatz to grab password from Windows 8.1

For Windows 7, 8, 2008 R2 and 2012, administrators can install the patch, KB2871997. After installing the patch, mimikatz just showed password hashed on these Windows versions except wdigest.

Using mimikatz to grab password from Windows 8 applied KB2871997

However, administrator can modify the following registry settings to disable cache credentials of wdigest or download and run the Microsoft Fix it of KB2871997.

Remark: Make sure you backed up the registry key before you modify it.

[HKEY_LOCAL_MACHINE\SYSTEM\CurrentControlSet\Control\SecurityProviders\WDigest\] “UseLogonCredential” =dword:0


In addition, administrator can configure additional LSA protection for Windows 8.1 and Windows Server 2012 R2.  Windows 8.1 and Windows Server 2012 R2 provide additional security to prevent reading memory and code injection by non-protected process. To configure additional LSA protection, administrators can create the following registry key.

Remark: Make sure you backed up the registry key before you modify it.

[HKEY_LOCAL_MACHINE\SYSTEM\CurrentControlSet\Control\LSA] “RunAsPPL” =dword:1


To disable additional LSA protection, change "RunAsPPL" to 0.

After configuring the additional LSA protection, the attacker tool might not access and read the lsass process.


Administrators cannot create a dump file of lsass process.

References:
Configuring Additional LSA Protection

What's Changed in Security Technologies in Windows 8.1

Documents for Pass-the-hash
Microsoft published some documents to talk about protecting LSA.

For an example, high privileged users shouldn't log in workstations to do the administrative tasks. They should set up a dedicated admin workstation for doing administrative tasks.

Installing the latest patch to the admin workstation.

For more information, please download and read Mitigating Pass-the-Hash (Pth) Attacks and Other Credential Theft, Version 2.

Further information
TWC: Recalling Windows Memories: Useful Guide to Retrieving and Analyzing Memory Content

TWC: Pass-the-Hash and Credential Theft Mitigation Architectures


Benjamin Delpy (twitter)

Protection from Kerberos Golden Ticket

Credentials Protection and Management

This posting is provided “AS IS” with no warranties, and confers no rights!

Thursday, August 7, 2014

Move the IIS default path on Windows Server 2008 or later

For security reason, administrators might be needed to move the default IIS path, Inetpub, to non-system drive. 

According to KB2752331, IIS is a core Windows component and cannot be installed on a non-system drive and Moving the Inetpub folder structure completely off of the system drive is not supported.

It seems that Microsoft doesn't suggest moving the default IIS path to non-system drive and administrators can select to save websites or applications to other folders and drives.  

However, Microsoft recommended to move the Inetpub to a different partition to save space and improve security in Security Best Practices for IIS 8 article.

Anyway, Microsoft provided the script for us to moving to a different drive but the script isn't supported by Microsoft. Administrators might take their own risk to perform this script to move the IIS default path.

The script example like this.


Prerequisite


Lab
Assuming that administrator logged in the IIS server.

1. After installing IIS, launch "Command Prompt" as administrator.
2. Perform the script file like this.


Remark: D is a destination drive letter. Administrators have to provide the drive letter for moving.

3. Perform "xcopy c:\inetpub d:\inetpub /E /O /I" to copy all contents with ACL to a new IIS path.


As a result, the default contents of IIS have move to a new path. However, administrators shouldn't delete the original IIS default path on the system drive.

References:
Guidance for relocation of IIS 7.0 and IIS 7.5 content directories

Security Best Practices for IIS 8

IIS7: Moving the INETPUB directory to a different drive

This posting is provided “AS IS” with no warranties, and confers no rights!

Wednesday, August 6, 2014

Configuring an alternate source path for installing roles or features on Windows Server 2012 and R2

In Windows Server 2012 or R2 core fresh installation, the source files aren't copied to the Windows to reduce disk space and some features like .NET Framework 3.5 and Windows Deployment Services (WDS) also aren't copied to Windows. To install .NET Framework 3.5, you can follow "Installing Microsoft .NET Framework 3.5 in Windows Server 2012 or R2 by Windows Server installation disk" to install the feature. However, administrators need to insert the Windows Server installation disk on the server. In domain environment, administrators can copy the sources file to a file share to share it. After that, administrators configure and assign to servers which are installed Windows Server 2012 or R2 core. It's more efficiency.

In addition to core installation, servers with GUI installation were performed "Uninstall-WindowsFeature" with "-Remove" parameter. The binary files for installing roles or features are deleted.

Goal
  • Configuring a file share path on a file server to share source files
  • Configuring default alternate source path for all servers by Group Policy
Lab environment
  • 1 file server is installed Windows Server 2012 R2 named FS02 is joined test.tls1.lab
  • 1 domain controller is installed Windows Server 2012 R2 named DC01
  • 1 server core member server  is installed Windows Server 2012 R2 named SC01
Lab
For the demonstration, I will use Domain Administrator to log in all servers. In production environment, you should use another account with local administrator right to complete the steps.

Configuring folder permission
1. On FS02, log in as Domain Administrator.
2. Create a folder named "Sources" in C drive.


Remark: In production environment, you should configure the share folder on non-system drive.

3. Right-click "Sources", select "Properties".
4. Select "Sharing" tab then click "Advanced Sharing".


5. On "Advanced Sharing" window, check "Share this folder".
6. Click "Permissions".


7. On "Permissions for Sources" window, remove "Everyone" and then add "Domain Computers".
8. Check "Allow - Read".


9. Click "OK" twice.
10. Select "Security" tab then click "Advanced".


11. On "Advanced Security Settings for Sources" window, click "Disable inheritance".


12. On "Block Inheritance" window, click "Convert inherited permissions into explicit permissions on this object".


13. Click "Remove" to remove "Users" on this permission table.


14. Click "Add".
15. On "Permission Entry for Sources" window, click "Select a principal".


16. Enter "Domain Computers".
17. Make sure the permission "Allow - Read, List folder contents and Read & execute" and "Applies to - This folder, subfolders and files".


18. Click "OK".


We assigned the "Allow - Read" permission for Domain Computers to access the "Sources" folder. Domain Users don't need to access this folder.

19. Click "OK" twice.
20. Insert Windows Server installation DVD and then copy "Install.wim" to "C:\Sources".


Remark: In production environment, you may create other subfolders to store the other Windows Versions like Windows Server 2012.

Configuring an alternate source path Group Policy Object
1. On DC01, log in as Domain Administrator.
2. Launch "Group Policy Management Console".
3. Right-click "Default Domain Policy", select "Edit".


4. Navigate to "Computer Configuration > Administrative Templates > System".
5. On the right pane, double-click "Specify settings for optional component installation and component repair".


6. On "Specify settings for optional component installation and component repair" window, select "Enabled".
7. Next to "Alternate source file path", enter "WIM:\\FS02\Sources\install.wim:4".
8. Check "Never attempt to download payload from Windows Update".


We configured to get the source files from the file share and don't allow servers to get sources from Windows Update.

9. Click "OK".
10. Close "Group Policy Management Console".

Testing
Make sure the server is applied the latest GPO.

1. On SC01, log in as Domain Administrator.
2. Launch "PowerShell".
3. Perform "Install-WindowsFeature WDS -IncludeAllSubFeature -IncludeManagementTools" to install Windows Deployment Services on SC01.


As a result, SC01 get the source files from FS02 to install the roles or features.

Additional: Administrators can perform "Get-WindowsFeature | Where InstallState -eq Removed" to check which role or service is needed an alternate source path for installation.


Reference:
Install or Uninstall Roles, Role Services, or Features

This posting is provided “AS IS” with no warranties, and confers no rights!