Showing posts with label PowerShell Deployment Toolkit (PDT). Show all posts

Thursday, June 12, 2014

Using PowerShell Deployment Toolkit to deploy System Center 2012 R2 for lab environment - Part 2

In part 1, we configured "Varaible.xml" and "Workflow.xml". After that, we performed "Downloader.ps1" on a PowerShell console to download all prerequisites components. We also copied Windows Server operating systems and System Center 2012 R2 software to the folders which are under "Installer" folder.

In this part, We'll configure "Varaible.xml" and "Workflow.xml" again for performing "VMCreator.ps1" and "Installer.ps1" to create virtual machines and install System Center 2012 R2 products.

Remark: Rob Willis releases the latest version of PowerShell Deployment Toolkit (PDT) which is 2.64.2611. Please go to the following website to download it.

PowerShell Deployment Toolkit

This version was updated the download link, file size and value code of Report Viewer 2012 Redistributable. It seems that the size of "ConfigMgt.Manifest.cab" in "Workflow.xml" is incorrect. We need to update it before installation.

VMCreator.ps1
VMcreator.ps1 is an optional PowerShell script to create virtual machines with IP and MAC addresses on a Hyper-Host. If administrators use "VariableAD.xml" for lab environment, VMcreator.ps1 creates service accounts in the lab environment. When all virtual machines are created, "Installer.ps1" will be copied to the "C:\Temp" of DC01 which is a virtual machine with Active Directory Domain Services role.


Then, "Installer.ps1" will follow the "Workflow.xml" to install System Center 2012 R2 with prerequisites components to other virtual machines.

Installer.ps1
Installer.ps1 is a script for installing System Center 2012 or System Center 2012 R2 on your environment. Installer.ps1 can be performed on physical or virtual environments. Before using this script, administrators need to create service accounts in your existing environment and then make sure server names and the drive letters should be matched to the "Variable.xml".


Goals

  • Configure the variable.xml
  • Deploying virtual machines by performing VMCreator.ps1
  • Installing System Center 2012 R2 by performing Installer.ps1
Lab environment
  • 1 standalone Windows Server 2012 R2 with Hyper-V role named HV01
Prerequisites
  • PowerShell Deployment Tookit (PDT ) is under C:\PDT of HV01
  • Download "Convert-WindowsImage.ps1" to C:\PDT folder for converting WIM to virtual hard disk files
  • A virtual switch named HVSwitch01 has been created in HV01 which can connect to the external network and access internet

Lab
1. On HV01, log in as Administrator.
2. Launch "PowerShell ISE".
3. Open "Variable.xml" and navigate to line "200".


There are some things administrators may need to change.

1. By default, the domain name is contoso.com. All service accounts and domain global groups will store in "Services.HQ" and "Groups.HQ". This option can be changed before performing "VMCreator.ps1".

2. By default, all virtual machines and virtual hard disks will store into "C:\VMs" folder. This option can be changed before performing "VMCreator.ps1". In my lab environment, I will change it to "D:\VMs".

3. "CorpNet01" is the default virtual switch name in "Variable.xml". Make sure the virtual switch name is same as your environment one. If not, please change it. In my lab environment, I will update a virtual switch name to "HVSwitch01".

4. The default "Prefix" name is "192.168.1" in "Variable.xml" and the first IP address of a virtual machine is "4" base on "Sequence". The next IP address of other virtual machines starts from "5". The subnet mask is "24" bits base on "Mask". For my lab environment, I need to update these values to the following:

<Prefix>172.16.100.</Prefix>
<Sequence>11</Sequence>
<Mask>16</Mask>
<Gateway>172.16.0.1</Gateway>
<DNS>172.16.100.11</DNS>

5. By default, all virtual machines will be used differencing virtual hard disk. Administrators can perform "Convert-WindowsImage.ps1" to create it and save it at C:\VHD folder. I will do it later

4. Scroll-down to line "260".


Administrators can modify the disk size, Ram size for every virtual machine.

Remark: By default, all virtual machines will be created to generation 1 configuration. To create generation 2 virtual machines, administrators can add <VMGeneration>2</VMGeneration> in the <Default> for all virtual machines or add <VMGeneration>2</VMGeneration> in each individual <VM>.


5. Scroll-down to line "400".


One of the virtual machine will be installed Windows Server 2008 R2 operating system. Then, we need to convert WIM to VHD.

6. Save and exit the "Variable.xml".
7. Insert "Windows Server 2008 R2 SP1 DVD" into HV01.
8. Launch "PowerShell" as administrator.
9. Navigate to "C:\PDT".
10. Perform ".\Convert-WindowsImage.ps1 -SourcePath E:\Sources\install.wim -VHDFormat VHDX -Edition ServerDataCenter -SizeBytes 100GB -VHDPath C:\VHD\WS08R2E-SP1.vhdx" to create a Windows Server 2008 R2 virtual hard disk with 100 GB disk size.
11. Enter "R".


12. Perform ".\Convert-WindowsImage.ps1 -SourcePath C:\Installer\WindowsServer2012R2\sources\install.wim -VHDFormat VHDX -Edition ServerDataCenter -SizeBytes 100GB -VHDPath C:\VHD\WS12R2D.vhdx" to create a Windows Server 2012 R2 virtual hard disk with 100 GB disk size.
13 Enter "R".


Remark: To create a generation 2 virtual hard disk by "Convert-WindowsImage.ps1", we can add "-VHDPartitionStyle GPT" parameter.


14. Perform "VMCreator.ps1" to create virtual machines.
15. Enter "R".


"VMCreator.ps1" checks all prerequisites components. If there is a problem in one of the components, it stops continuing creating any virtual machine. administrators can delete a component and then perform "Downloader.ps1" to re-download the incorrect component or update the size in "Workflow.xml". Administrators can add "-SkipValidation" parameter to skip check all validation.

When validation finished, 'VMCreator.ps1" started to create virtual machines on the current Hyper-v host.


It takes some times to create all virtual machines.


After created all virtual machines, all virtual machines will join to the domain automatically.


16. Enter "R" in DC01's Command Prompt to perform "Installer.ps1".


It spends some times to install all System Center 2012 R2 products to all virtual machines.

Is it difficult to modify the "Variable.xml" and "Workflow.xml"?

If yes, please try to use "PDT GUI".

PDT-GUI is a GUI tool to modify "Variable.xml". This tools is created by Benedict Berger (Hyper-V MVP and Hybrid Cloud Geek) and Kamil Kosek (Powershell Geek and Automation IT Pro).

How to use it?

1. Download PDT GUI and then save as the same folder of "Variable.xml" and "Workflow.xml".
2. Perform "PDT-GUI.Export.ps1" to launch "PDT GUI".
3. Enter "R".


4. On "Select file" tab, select "Browse for variable file" to select existing "Variable.xml".


5. On "General" tab, we can modify the settings.


6. On "VMs" tab, we can define the domain name, default VM settings and how many VMs we need.


7. On "SQL" tab, we can configure SQL service account, password, installation folder and so on.


8. On "Roles" tab, we can select which role to install to which server and we can also add or remove a role in this pane.


9. On "Finish" tab, we can perform the "Downloader.ps1", "VMCreator.ps1" and "Installer.ps1". These scripts will follow the "Variable.xml" and "Workflow.xml" which we updated.

Other parts
Using PowerShell Deployment Toolkit to deploy System Center 2012 R2 for lab environment - Part 1

More information
Deployment-The PDT VM Creator

Deployment-VMCreator updates with PDT 2.6

ThojoUno / PDT (Some updated Variable.xml and Workflow.xml by other)

Automating Microsoft System Center Deployments with the PowerShell Deployment Toolkit

This posting is provided “AS IS” with no warranties, and confers no rights!

Saturday, June 7, 2014

Using PowerShell Deployment Toolkit to deploy System Center 2012 R2 for lab environment - Part 1

PowerShell Deployment Toolkit (PDT) is a set of scripts written by Rob Willis, Principal Program Manager of Microsoft, for administrators to deploy all System Center 2012 or System Center 2012 R2 components easily. However, this latest version of PDT doesn't download Windows Server 2012 or R2 and System Center 2012 or R2 components. Administrators have to download and then extract it to the specific folders. The latest of PDT is 2.64.2608. The zip file included the following files.

Downloader.ps1
Installer.ps1
Variable.xml
VariableAD.xml
VMCreator.ps1
Workflow.xml

Administrator can download PDT at the following link.


To use these scripts, administrators need to understand the files usage. In part 1, I will focus on Variable.xml, Workflow.xml and Downloader.ps1.

Variable.xml
Variable.xml is a file to store service account names, password of service accounts, VM names with configuration and the prerequisites software download path for System Center deployment.


This file is used by Downloaded.ps1, VMCreator.ps1 and Installer.ps1.

Remark: VariableAD.xml is same as variable.xml but it included some additional codes to install a virtual machine for Active Directory server role. To use variableAD.xml, administrators need to rename it from variableAD.xml to variable.xml.

Workflow.xml
Workflow.xml is a file for installer.ps1 to install System Center into the VMs and then it also is used by downloader.ps1 to check and download the software from internet. I will modify workflow.xml later.

Downloader.ps1
Downloader.ps1 is a PowerShell script to help administrators to download all prerequisites components for installation. However, it doesn't download Windows Server 2012 or Windows Server 2012 R2 operating system and System Center 2012 or System Center 2012 R2 software. Administrators download and copy the software to a folder which is stored with other prerequisites components.

Goal

  • Configure the variable.xml file
  • Download prerequisites components by Downloader.ps1

Lab environment

  • 1 standalone Windows Server 2012 R2 with Hyper-V role named HV01
  • 1 demo VM is installed Windows Server 2012 R2 for testing to download prerequisites components

Prerequisites

  • Download and extract PowerShell Deployment Toolkit (PDT) from the above link to C:\PDT

Lab
1. On a demo VM, log in as Administrator.
2. Launch "PowerShell ISE".
3. Open "VariableAD.xml".


By default, the temp path is under "$SystemDrive\Temp" and the download "Path" is "C:\Installer". Administrators can change it perform download the prerequisites components.


Then, administrators can define the user name and password for all service accounts. These service accounts are needed to create by administrators in the Active Directory. Downloader.ps1, VMCreator.ps1 and Installer.ps1 don't create the service accounts. We will configure this file again in part 2.

4. Save and exit the file.
5. Change the file name to "Variable.xml" to "Variable-Org.xml" and then change "VariableAD.xml" to "Variable.xml".


6. Launch "Windows Explorer" and then navigate to C:\.
7. Double-click "7z920-x64"to install "7 zip".


8. Double-click "wpilauncher" to install "Microsoft Web Platform Installer 5.0".


9. When installation finished, click "Exit".


10. Launch "PowerShell" as administrator.
11. Navigate to "C:\PDT".
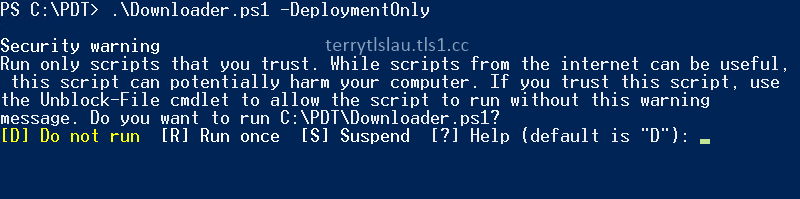
12. Perform ".\Downloader.ps1 -DeploymentOnly" to download all prerequisites components for deploying System Center 2012 R2 because it bases on the "Variable.xml". If administrators perform ".\Downloader.ps1", the script download all components for System Center 2012 and System Center 2012 R2.


13. Enter "R".

Remark: Make sure perform "Set-ExecutionPolicy Unrestricted" before perform the PDT scripts because these scripts aren't signed.


Then, the scripts will follow workflow.xml to download and then use "7-zip" to extract the packages. Base on your internet bandwidth, it may need to take a few hours to download all prerequisites components.


If the "7-zip" and "Microsoft Web Platform Installer 5.0" isn't installed in the computer, the script remind you to install these software.


Remark: Some download links may be changed. Administrators will get the error message when it is downloading software.

To solve this issue, administrators need to update the download link in "Workflow.xml". In the above screen capture, administrators need to search this package from internet and then update the download link of "Report Viewer 2012 Redistributable".


After that, administrators have to update the "FileSize" and "Value" of "Report Viewer 2012 Redistributable".


To check the "FileSize", administrators can check the properties of the file.


To check the value, I installed "Report Viewer 2012 Redistributable" to another VM. Locate the "Value" from the following path of the registry.

HKEY_LOCAL_MACHINE\SOFTWARE\Classes\Installer\Products\1144BDFD2A45EC14BA98EC451C676AD9

Then, double-click "Production".


This is the value of the "Report Viewer 2012 Redistributable". Copy and paste it on the "Workflow.xml".


Then, save and exit the "Workflow.xml".

Remark: The "FileSize" and "Value" should be different on every updated files. Administrators have to manually update it on "Workflow.xml".

14. Administrators can perform ".\Downloader.ps1 -DeploymentOnly" to verify all prerequisites components to be downloaded successfully.


15. Launch "PowerShell ISE" and then open "Workflow.xml".


16. Try to find "Windows Server 2012 R2" in a script.


"Windows Server 2012 R2" is found in "workflow.xml". Next to "Value", "WindowsServer2012R2" is the folder name which we need to create under "C:\Installer" to store the Windows Server 2012 R2 setup files. Administrators also need to find all folder names of System Center 2012 R2 components.


All System Center 2012 R2 software is under "C:\Installer\SystemCenter2012R2".

17. Close "PowerShell ISE".
18. Launch "Windows Explorer" and then create the folders for Windows Server 2012, Windows Server 2012 R2 and System Center 2012 R2 under "C:\Installer" and "C:\Installer\SystemCenter2012R2".


19. Administrators need to copy the setup files from the ISOs of Windows Server 2012, Windows Server 2012 R2 and System Center 2012 R2 to the folders which we created.


20. Back to PowerShell, perform ".\Downloader.ps1 -DeploymentOnly" to verify all components for installation.


Finally, all software are ready for installation.

In part 2, we will try to use "VMCreator.ps1" to deploy the VMs.

Other parts
Using PowerShell Deployment Toolkit to deploy System Center 2012 R2 for lab environment - Part 2

More information
This posting is provided “AS IS” with no warranties, and confers no rights!