Showing posts with label Windows 8. Show all posts

Tuesday, April 11, 2017

Certlm.msc on Windows Server 2012 / Windows 8 or later

Started from Windows Server 2012 / Windows 8 or later, there is a new msc, Certlm.msc, were added to the Windows. Certlm.msc can directly open a computer certificate store. As previous, we needed to use Microsoft Management Console to add the computer certificate store to the console. So, It's easy for administrator to check the computer certificate via GUI.


This posting is provided “AS IS” with no warranties, and confers no rights!

Thursday, February 25, 2016

Using robocopy for file servers migration

"Robocopy" is a robust and powerful command on Windows to copy files and directories. Why do we use "robocopy" for file server migration?

There are some reasons.
1. It can maintain NTFS permission of files and directories during copy to new file server within the same domain.
2. It provided verification function to check the difference of source and destination
3. "Robocopy" supports multi-threaded copies. It improves the efficiency.
4. The backup mode of "robocopy" can copy files or directories to destination which you aren't granted permission to access it.

In my case, I performed "robocopy" with the following parameters to copy files and directories from source to destination.

Assuming that I logged in to a new file server, Windows Server 2012 R2, and then mapped network to the old file server.

For the first time, I performed Robocopy <source directory or drive> <Destination directory or drive> /ZB /e /sec /copyall /TEE /MT:128 /r:0 /log:C:\copylog.txt

/ZB: use restart mode first. If the file or directory isn't granted permission for us to copy, use backup mode to copy it.
/e: copy subdirectories, including Empty ones.
/sec: copy files and directories with Security
/copyall: copy files and directories info like auditing info
/TEE: this is an optional parameter which is displayed the coping status on "Command Prompt"
/MT:128 use 128 threaded to copy files and directories. However, it use many CPU resource.
/r:0 I don't want to retry at this time.
/log: save a log file to location

The second time, I prefer to copy the delta of files and directories. I added 4 parameters to copy from source to destination again.

Robocopy <source directory or drive> <Destination directory or drive> /ZB /e /sec /copyall /TEE /MT:128 /r:1 /XD /XF /XO /purge /log:C:\copylog.txt

/XD: eXclude Directories matching given names/paths but it can still add new or extra directories
/XF: eXclude Files matching given names/paths/wildcards but it still can add new or extra files
/XO: exclude older files or directories
/purge: delete dest files/dirs that no longer exist in source. 

After that, we can migrate share permission of share folder. To migrate share permission, please read Migrating File Servers in the same domain. Then, we can stop sharing from the old server and change the network drive mapping to the new file server.

This posting is provided “AS IS” with no warranties, and confers no rights!

Sunday, February 21, 2016

Change network connection profile by PowerShell on Windows 8 or later

Started from Windows 8, there are 2 PowerShell cmdlets for administrators to get and set network connection profiles which are Get-NetConnectionProfile and Set-NetConnectionProfile.

Get-NetConnectionProfile can check the current network connection profile for all network NICs.

The current network profile of this NIC is "Private"

To change the network connection profile to public, we can perform Set-NetConnectionProfile -InterfaceAlias <NIC Name> -NetworkCategory Public.

The network connection profile has been changed to "Public"

Make sure the PowerShell console is "run as administrator". if not, you get the following error message.

Set-NetConnectionProfile : Unable to set the NetworkCategory ...

From Windows 10 PowerShell console

The another reason to show this error message is that you performed Set-NetConnectionProfile to "DomainAuthenticated".

From Windows 8.1 PowerShell console

"DomainAuthenticated" network connection profile should be automatically assigned when a computer was joined domain. It cannot be changed by Set-NetConnectionProfile cmdlet because it is controlled by "Network List Manager" of Group Policy. However, we can change the other NICs of domain computers.


This posting is provided “AS IS” with no warranties, and confers no rights!

Wednesday, November 25, 2015

Install or uninstall multiple Windows Updates by WUSA and PowerShell

WUSA is a command for Windows to install or uninstall Windows update. In this post, I'd like to use WUSA to work with PowerShell to install or uninstall Windows Update on a computer.

Install
To silently install a Windows update and postpone restart a computer, we can perform (Get-ChildItem <Windows Update Package path>).FullName | %{Start-Process wusa "$_ /quiet /norestart" -wait} on PowerShell console


Uninstall
To silently uninstall a Windows update and postpone restart a computer, we can perform wusa /uninstall /kb:<the number of the KB> /quiet /norestart


Remark: Some Windows Updates are required to restart a computer to take action.

To combine with PowerShell to uninstall some Windows Updates, we can perform (Get-Hotfix).hotfixid.substring(2) | Select -last 3 | %{Start-Process wusa "/uninstall /kb:$_ /quiet /norestart" -wait} on PowerShell console to uninstall last 3 Windows Updates. 


There is an example. Based on the search criteria, we can change it like this Get-Content <File Name> | %{Start-Process wusa "/uninstall /kb:$_ /quiet /norestart" -wait}


This posting is provided “AS IS” with no warranties, and confers no rights!

Sunday, October 25, 2015

Check allocation unit size of formatted NTFS volume

To easily check the current allocation unit size of formatted NTFS volume, we can perform fsutil command to do it.

1. Launch Command Prompt at administrator.
2. Perform fsutil fsinfo ntfsinfo <Drive letter or CSV path> to check the "Bytes Per Cluster".

This volume was formatted as 4K

This volume was formatted as 64K

Or, we can perform Get-CimInstance Win32_Volume | FT Name,BlockSize -AutoSize to check it.


This posting is provided “AS IS” with no warranties, and confers no rights!

Saturday, September 26, 2015

Security in the Enterprise on Microsoft Virtual Academy (MVA) course

There is a new course on Microsoft Virtual Academy (MVA) to talk about security. Security in the Enterprise is hold by Simon May, Infrastructure Technical Evangelist, and Erdal Ozkaya, Microsoft MVP in Windows IT Pro. It a entry level MVA course to let you understand the concept and get some tips to protect your enterprise. It's worth watching it.

This posting is provided “AS IS” with no warranties, and confers no rights!

Saturday, March 14, 2015

Setup Point-To-Site VPN to Microsoft Azure

Microsoft Azure accepts Point-To-Site VPN to connect a Microsoft Azure Virtual Network from a workstation or server. To configure Point-To-Site VPN to Microsoft Azure Virtual Network, you don't need any VPN device. All configurations are software based and can be done on a Windows 7 or later workstation. I'm going to configure Point-To-Site VPN for testing.

These are the high level configuration tasks for Point-To-Site VPN.

1. Create a virtual network with point-to-site connectivity or modify existing virtual network with point-to-site connectivity.
2. Create a dynamic routing gateway for the virtual network.
3. Generate a root certificate and computer certificate for VPN authentication by Microsoft Visual Studio Express 2013 for Windows Desktop
4. Download the VPN client configuration package for a computer which will be connected to the virtual network.

Goal
Configure a VPN connection from a workstation to Microsoft Azure virtual network.

Prerequisites
Lab environment
  • 1 x Windows 10 64 bit workstation was installed Microsoft Visual Studio Express 2013 for Windows Desktop. This workstation is under 172.16.x.x network. I will use this workstation to set up VPN and then connect to Microsoft Azure virtual network
Lab
Create a new virtual network with Point-to-Site Connectivity

1. On Azure management portal, click "New > Network Services > Virtual Network > Custom Create".


2. On "Virtual Network Details" window, enter a name and select location. Then, click "Next" button.


In my lab environment, I entered VPNNetwork for the virtual network name.

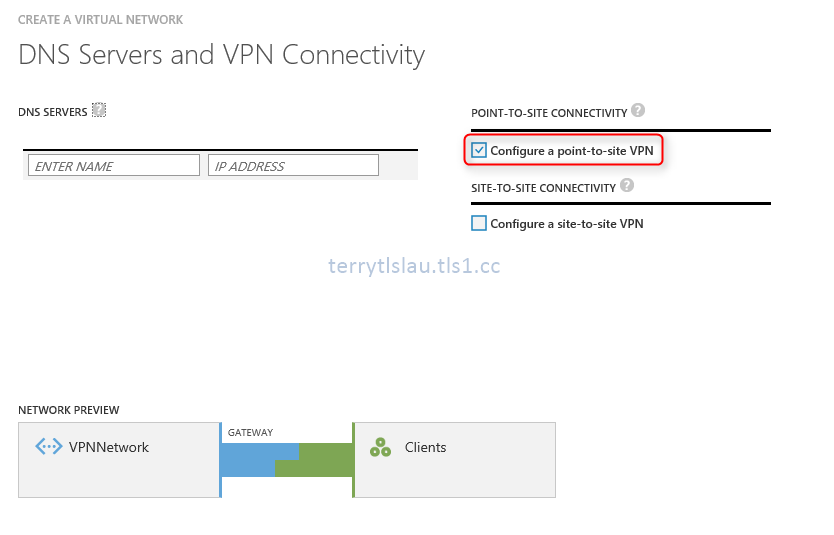
3. On "DNS Servers and VPN Connectivity" window, check Configure a point-to-site VPN" option.


I will use a IP address to connect a virtual machine on this virtual network so I don't enter any DNS servers information.

4. Click "Next" button.
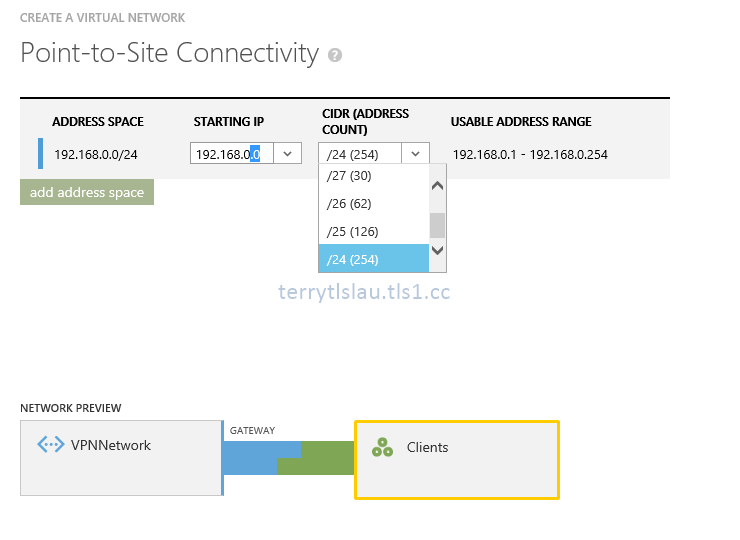
5. On "Point-to-Site Connectivity" window, you can only select private network because these IP will be assigned to VPN clients.


At this time, I select 192.168.0.0 IP address range for VPN clients.


The maximum IP address range for VPN clients is 24 bit. There are total 254 IP addresses.

6. Click "Next" button.
7. On "Virtual Network Address Spaces" window, I choose 10.0.0.0/8 Address Space. Then, I create a subnet which is 10.0.1.0/24 for virtual machine and I also added 10.0.0.0 /29 to this virtual network to be a subnet gateway.


According to Microsoft, gateway service that we run to enable cross-premises connectivity. We need 2 IP addresses from your routing domain for us to enable routing between your premises and the cloud. We require you to specify at least a /29 subnet from which we can pick IP addresses for setting up routes.

Please note that you must not deploy virtual machines or role instances in the gateway subnet.

8. Click "Finish" button.


Create a dynamic routing gateway in VPNNetwork

1. On "VPNNetwork" page, click "Create Gateway" button.


2. Click "Yes" to create.


Then, we can see the notification about creating a gateway on Microsoft Azure Portal. It needs to take about 20 minutes to create a gateway for this virtual network.


Additional information: One of my virtual network stopped at this screen on Microsoft Azure portal. I cannot remove that network at this moment by Portal or PowerShell. Make sure you don't make any change when the gateway is being created.


Then, the gateway IP address is ready.

Generate a root certificate and upload certificate to the virtual network
If the workstation has been installed  Microsoft Visual Studio Express 2013 for Windows Desktop, makecert.exe is located at the following paths.


1. On the Command Prompt, navigate to the "C:\Program Files (x86)\Windows Kits\8.1\bin\x64".
2. Perform makecert -sky exchange -r -n "CN=<Root Cert CN Name>" -pe -a sha256 -len 4096 -ss My "<File path to save the root certificate>" to create a root certificate which is used sha256 algorithm with 4096 key length and then save the file to C:\VPNNetworkRoot.cer


Make sure perform makecert as an administrator Command Prompt. If not, you get the following error message.

Error: WriteFile failed => 0x5 (5)
Failed


Now, we can upload the root certificate to the virtual network.

3. On "VPNNetwork" page, select "Certificates".
4. Click "Upload a Root Certificate".


5. On "Upload Certificate" window, click folder icon to browse the root certificate on the computer.


6. Click "Tick" button.


The root certificate has been uploaded to this virtual network.


Generate a client certificate to connect the Microsoft Azure Virtual network
We're going to use the same workstation to generate the client certificate for VPN connection. Actually, you don't need to install Microsoft Visual Studio Express 2013 for Windows Desktop to all VPN clients. Microsoft Visual Studio Express 2013 for Windows Desktop is applied to generate the root and client certificates. It's okay to assign 1 workstation for generating certificates. In my lab environment, I used the workstation to do both tasks.

To generate a client certificate, make sure you have installed root certificate on the same computer.

  
1. On Windows 10 workstation, perform makecert.exe -n "CN=<VPN client CN name>" -pe -sky exchange -m 96 -ss My -in "<Root cert name>" -is my -a sha256 to generate a client certificate which is used sha256 algorithm.


Then, you can find this client certificate in certificate console.


We can export this client certificate and then import it into another computer which will connect to Microsoft Azure Network. In my lab, I don't need to export this certificate.

Download and install VPN client configuration package 
On the network page of Azure portal, we can download the VPN client configuration package.


1. Run the package.


2. Click "Yes" to install.


Then, you can find the VPN connection on your network setting of the computer.


Verify the result
1. Click the VPNNetwork, select Connect.


2. On VPNNetwork dialog box, click "Connect".


3. Perform ipconfig in the command prompt to verify the result


As a result, the workstation got the IP address 192.168.0.2. Now, it can connect to VPNNetwork which is locate in Microsoft Azure Virtual Network.

Remark: If there is no certificate in the computer, you get this message when click Connect on the dialog box.

A certificate could not be found that can be used with this Extensible Authentication Protocol. (Error 798)


Additional information
Keith Mayer, Senior Technical Architect at Microsoft, wrote a post about how to revoke the point to site VPN certificate. You can read the following blog post for your information.


This posting is provided “AS IS” with no warranties, and confers no rights!

Wednesday, December 3, 2014

3 ways to get remote computers MAC address on Windows Servers or Workstations

There are many ways to get remote computers MAC address on Windows. In this post, I'd like to show 3 ways to get MAC addresses. To get remote computers MAC address, you need to have administrative credential on remote computers and make sure firewalls of computers or network don't block the connection between both computers.

Getmac
Getmac is a built-in command started from Windows XP to get mac addresses from a local computer or remote computer.

On "Command Prompt", perform "getmac /v /s <Remote Computer Name> /U <Remote or Domain User Account with administrative privilege> /FO <List, Table or CSV>" to get MAC addresses from a remote computer.


Enter the password of the account to get the result.

Remark: Both computers communicate with TCP port 135.

Windows Management Instrumentation Command-line (WMIC)
Windows Management Instrumentation Command-line (WMIC) is a command to work with WMI to get or modify the settings of a computer. In this case, I'm going to use wmic to get a remote computer MAC address.

On "Command Prompt", perform "wmic /user:<Remote or Domain User Account with administrative privilege> /node:<Remote computer name> nic list brief".


Enter the password of the account to get the result.

PowerShell
PowerShell is a good way to get information from computers. It's easy for administrators to learn and use. By the way, we can perform the following cmdlet to get MAC address from remote computers.

On "PowerShell" console, perform "Invoke-Command -ComputerName <Remote Computer Names> -Credential (Get-Credential) -ScriptBlock {Get-CimInstance -ClassName Win32_NetworkAdapter | FT Name,MacAddress -AutoSize}" on Windows 8, Windows 8.1, Windows Server 2012 or Windows Server 2012 R2.


Enter the user name and password with administrative privilege of the remote computer.


Remark: Get-CimInstance is a built-in cmdlet on PowerShell 3.0 or later. For Windows 7 or Windows Server 2008 R2, we can perform "Get-WmiObject -Class Win32_NetworkAdapter -ComputerName <Remote Computer Name> -Credential (Get-Credential)".


Enter the user name and password with administrative privilege of the remote computer.


Eventually, we got MAC addresses from above methods.

More information:


This posting is provided “AS IS” with no warranties, and confers no rights!

Wednesday, November 19, 2014

Remote Desktop Connection Manager 2.7

I think a lot of people have been waiting for a new version of Remote Desktop Connection Manager. On 18-Nov-2014, Microsoft released a new version of Remote Desktop Connection Manager which is version 2.7.1406.0. In this version of Remote Desktop Connection Manager, it supports the following Operating System: Windows 10 Technical Preview, Windows 7, Windows 8, Windows 8.1, Windows Server 2008, Windows Server 2008 R2, Windows Server 2012, Windows Server 2012 R2 and Windows Server Technical Preview.

Remark: Users need to install version 6 or later of the Remote Desktop Client before installing Remote Desktop Connection Manager 2.7 on Windows XP and Windows Server 2003.


If you are interested in Remote Desktop Connection Manager 2.7, please go to the following link to download and use it.

Download link

This posting is provided “AS IS” with no warranties, and confers no rights!

Wednesday, August 20, 2014

Create a schedule task to run PowerShell script

Nowadays, many administrators write their own PowerShell scripts and perform it in the production environment. Administrators may create a basic task in Task Scheduler to run the PowerShell script for daily operations.

To create a basic task to run the PowerShell script, we can do the following steps.

1. On a server or workstation, log in as Administrator.
2. Launch "Task Scheduler".
3. Next to "Actions" pane, click "Create Basic Task".


4. On "Create a Basic Task" window, enter the name of your task.


5. Click "Next".
6. On "Trigger" window, select the period of your task. In my lab environment, I selected "Daily".


7. Click "Next".
8. On "Daily" window, select the "Start" time of this task.


9. Click "Next".
10. On "Action" window, select "Start a program".


11. Click "Next".
12. On "Start a Program" window, next to "Program/script", enter "PowerShell".
13. Next to "Add arguments (optional)", enter the script path.


14. Click "Next".
15. Check "Open the Properties dialog for this task when I click Finish" and then click "Finish".


16. On "Move log files Properties" window, we can change to "SYSTEM" account by  entering "SYSTEM" in "Change User or Group".


17. Click "OK" to close "Move log files Properties".


As a result, the schedule task for this PowerShell script was created.

Remark: Before you create the schedule task, you may need to change the "Execution Policy" to "unrestricted" or "RemoteSigned" by performing "Set-ExecutionPolicy".

We can also perform the following cmdlets to create a schedule task in Windows 8, Windows 8.1, Windows Server 2012 and Windows Server 2012 R2.

$Action = New-ScheduledTaskAction -Execute "PowerShell.exe" -Argument "C:\Move-Log.ps1"
$Trigger = New-SchedulesTaskTrigger -Daily -At 1am
$Settings = New-ScheduledTaskSettingsSet
$Task = New-ScheduledTask -Action $Action -Trigger $Trigger -Settings $Settings
Register-ScheduledTask "Move Log File 2" -InputObject $Task -User "NT Authority\SYSTEM"


This posting is provided “AS IS” with no warranties, and confers no rights!