Microsoft released a new version of System Center Virtual Machine Manager at 18-Oct-2013. The latest version is System Center Virtual Machine Manager 2012 R2. Staring from System Center Virtual Machine Manager 2012, Virtual Machine Manager (VMM) isn't limited to manage virtual machines and virtualization hosts. It can manage storage (Physical SAN storage, Storage Pool of Windows Servers, Scale-out file servers and so on), network (IPAM, network virtualization, physical switches, virtual switches and so on), and so on.
In System Center Virtual Machine Manager 2012 R2, there is no self-service portal. Administrators don't need to install IIS component in a server. To use a web interface to manage System Center Virtual Machine Manager 2012 R2, administrators need to install System Center 2012 R2 App Controller.
I will install System Center Virtual Machine Manager 2012 R2 in a server named VMM01 in my test lab environment.
For more information about the new features:
This is the download link of Microsoft System Center 2012 R2:
Goal
Install System Center Virtual Machine Manager 2012 R2 with required components in Windows Server 2012 R2.
Lab environment
Computer Name: DC01.test.tls1.lab
Server Roles: Domain Controller and DNS Server
Operating System: Windows Server 2012 R2
Computer Name: VMM01.test.tls1.lab
Server Roles: VMM management server
Operating System: Windows Server 2012 R2
Computer Name: DB01.test.tls1.lab
Server Roles: VMM database (SQL Server 2012 standard SP1)
Operating System: Windows Server 2012 R2
Prerequisites
- The domain environment has been set up. If you would like to know how to prepare a domain, please read Dcpromo on Windows Server 2012
- Download "Windows Assessment and Deployment Kit (ADK) for Windows 8.1" in VMM01 C:\ADK
- Download "SQL Server Command Line Utilities" in VMM01 C:\Sql
- Download "Microsoft SQL Server 2012 Native Client" in VMM01 C:\Sql
- Create the following accounts in Active Directory and configure "Password never expires" option for these accounts


- VMMAdmin is a member of SCVMM Admins group

Lab
Assign local administrators permission for VMM and SQL accounts
1. On VMM01, log in as Domain Administrator.
2. Launch "Computer Management".
3. Expand "System Tools > Local Users and Groups > Groups".

5. On "Administrators Properties" window, add "SCVMM Admins" group and "VMMsvc" account.

7. Repeat step 1 - 6 to add SQLAdmin in the Administrators group of DB01.

Before installing System Center Virtual Machine Manager (SCVMM), administrators need to create a container in an Active Directory. This container is used to storing the encryption keys for virtual machine manager.
1. On DC01, log in as Domain Administrator.
2. Launch "ADSI Edit" by entering "adsiedit.msc" on Start menu.
3. Right-click "ADSI Edit", select "Connect to".

4. On "Connection Settings" window, next to "Select a well known Naming Context", select "Default naming context".

5. Click "OK".
6. Right-click "DC=test,DC=tls1,DC=lab", select "New > Object".

7. On "Select a class" window, select "container".

8. Click "Next".
9. On "Attribute" window, next to "Value", enter "VMMDKM".

This value is applied to distributed key management in VMM.
10. Click "Next".
11. On "To complete the creation of this object" window, click "Finish".

12. Launch "Active Directory Users and Computers".
13. On the menu, select "View > Advanced Features".

14. Right-click "VMMDKM", select "Properties".

15. On "VMMDKM Properties" window, select "Security" tab.
16. Click "Advanced".

17. On "Advanced Security Settings for VMMDKM" window, click "Add".

18. On "Permission Entry for VMMDKM" window, click "Select a principal".

19. Add "SCVMM Admins".
20. Next to "Permissions" section, check "Full control".
21. Next to "Applies to" section, select "This object and all descendant objects".

22. Click "OK".

23. Click "OK" twice.
1. On DC01, log in as Domain Administrator.
2. Launch "ADSI Edit" by entering "adsiedit.msc" on Start menu.
3. Right-click "ADSI Edit", select "Connect to".
6. Right-click "DC=test,DC=tls1,DC=lab", select "New > Object".
9. On "Attribute" window, next to "Value", enter "VMMDKM".
10. Click "Next".
11. On "To complete the creation of this object" window, click "Finish".
13. On the menu, select "View > Advanced Features".
16. Click "Advanced".
20. Next to "Permissions" section, check "Full control".
21. Next to "Applies to" section, select "This object and all descendant objects".
Installing and configuring SQL Server on DB01
1. On DB01, log in as SQLAdmin.
2. Insert SQL Server 2012 SP1 installation disk.
3. Click "Run SETUP.EXE".
2. Insert SQL Server 2012 SP1 installation disk.
3. Click "Run SETUP.EXE".


7. On "License Terms" window, check "I accept the license terms".

9. On "Product Updates" window, leave default settings, click "Next".


14. On "Installation Rules" windows, click "Next".


18. Change the "Startup Type" of "SQL Server Agent" to "Automatic".

20. On "Database Engine Configuration" window, click "Add Current User".


22. On "Error Reporting" window, click "Next".


27. On "Connect to Server" window, click "Connect".


31. Next to "Server roles", check "dbcreator" and "securityadmin".


34. Launch "Windows Firewall with Advanced Security".
35. Right-click "Inbound Rules", select "New Rule".

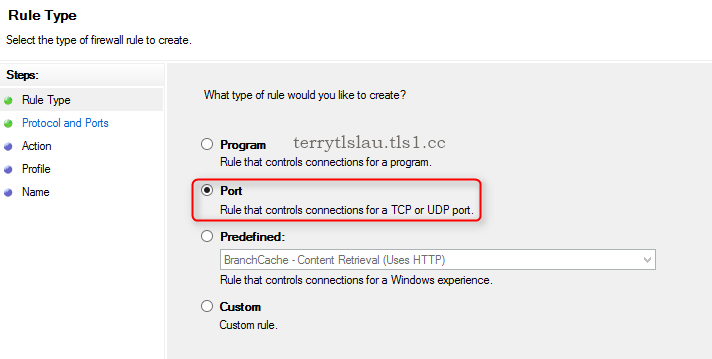

39. On "Action" window, select "Allow the connection", click "Next".


Installing SCVMM management server and console
Before installing SCVMM management server and console, administrators have to install "Microsoft SQL Server 2012 Native Client", "Microsoft SQL Server 2012 Command Line Utilities" and components of "Windows Assessment and Deployment Kit for Windows 8.1" in a server.
1. On VMM01, log in as VMMAdmin.
2. Launch "Windows Explorer" and then navigate to "C:\Sql".
3. Double-click "sqlncli" to install "Microsoft SQL Server 2012 Native Client" with "Client Components".


4. Double-click "SqlCmdLnUtils" to install "Microsoft SQL Server 2012 Command Line Utilities".

5. Navigate to C:\ADK, double-click "adksetup".
6. On "Specify Location" window, leave default settings, click "Next".

7. On "Join the Customer Experience Improvement Program (CEIP)" window, leave default settings, click "Next".

8. On "License Agreement" window, click "Accept".

9. On "Select the features you want to install" window, check "Deployment Tools" and "Windows Preinstallation Environment (Windows PE)".

10. Click "Install".
11. When installation completed, click "Close".

12. Insert "System Center Virtual Machine Manager 2012 R2" installation disk.
13. Click "Run setup.exe".

14. On "Microsoft System Center 2012 R2" menu, click "Install".

15. On "Select features to install" window, check "VMM management server" and "VMM console".

16. Click "Next".
17. On "Product registration information" window, click "Next".

18. On "Please read this license agreement" window, check "I have read, understood, and agree with the terms of the license agreement", click "Next".

19. On "Customer Experience Improvement Program (CEIP)" window, select "Yes, I am willing to participate in the Customer Experience Improvement Program", click "Next".

20. On "Microsoft Update" window, select "On (recommended)", click "Next".

21. On "Installation location" window, click "Next".

22. On "Database configuration" window, next to "Server name", enter "DB01".
23. Next to "Instance name", enter "MSSQLSERVER".

24. Click "Next".
25. On "Configure service account and distributed key management" window, select "Domain account".
26. Under "User name and domain", enter "TLS1Test\VMMSvc" and password of "TLS1Test\VMMSvc".
27. Check "Store my keys in Active Directory".
28. Under "Provide the location in Active Directory", enter "CN=VMMDKM,DC=test,DC=tls1,DC=lab".

29. Click "Next".
Remark: If the service account isn't under local administrator group, you discover the following error.

30. On "Port configuration" window, leave ports settings, click "Next".

31. On "Library configuration" window, leave default settings, click "Next".

Administrators can add other library server from other file server.
32. On "Installation summary" window, click "Install".

33. When installation completed, click "Close".

More information
1. On VMM01, log in as VMMAdmin.
2. Launch "Windows Explorer" and then navigate to "C:\Sql".
3. Double-click "sqlncli" to install "Microsoft SQL Server 2012 Native Client" with "Client Components".
6. On "Specify Location" window, leave default settings, click "Next".
11. When installation completed, click "Close".
13. Click "Run setup.exe".
17. On "Product registration information" window, click "Next".
23. Next to "Instance name", enter "MSSQLSERVER".
25. On "Configure service account and distributed key management" window, select "Domain account".
26. Under "User name and domain", enter "TLS1Test\VMMSvc" and password of "TLS1Test\VMMSvc".
27. Check "Store my keys in Active Directory".
28. Under "Provide the location in Active Directory", enter "CN=VMMDKM,DC=test,DC=tls1,DC=lab".
Remark: If the service account isn't under local administrator group, you discover the following error.
32. On "Installation summary" window, click "Install".
Configuring Distributed Key Management in VMM
Specifying a Service Account for VMM
System Requirements: VMM Management Server
System Requirements: VMM Console
System Requirements: VMM Database
Deploying System Center 2012 - Virtual Machine Manager
Specifying a Service Account for VMM
System Requirements: VMM Management Server
System Requirements: VMM Console
System Requirements: VMM Database
Deploying System Center 2012 - Virtual Machine Manager
This posting is provided “AS IS” with no warranties, and confers no rights!
No comments:
Post a Comment