Microsoft Azure accepts Point-To-Site VPN to connect a Microsoft Azure Virtual Network from a workstation or server. To configure Point-To-Site VPN to Microsoft Azure Virtual Network, you don't need any VPN device. All configurations are software based and can be done on a Windows 7 or later workstation. I'm going to configure Point-To-Site VPN for testing.
These are the high level configuration tasks for Point-To-Site VPN.
1. Create a virtual network with point-to-site connectivity or modify existing virtual network with point-to-site connectivity.
2. Create a dynamic routing gateway for the virtual network.
3. Generate a root certificate and computer certificate for VPN authentication by Microsoft Visual Studio Express 2013 for Windows Desktop
4. Download the VPN client configuration package for a computer which will be connected to the virtual network.
Goal
Configure a VPN connection from a workstation to Microsoft Azure virtual network.
Prerequisites
- Microsoft Azure Account is ready for testing
- Download and install Microsoft Visual Studio Express 2013 for Windows Desktop on a Windows 7 or later for generating root and client certificates
Lab environment
- 1 x Windows 10 64 bit workstation was installed Microsoft Visual Studio Express 2013 for Windows Desktop. This workstation is under 172.16.x.x network. I will use this workstation to set up VPN and then connect to Microsoft Azure virtual network
Lab
Create a new virtual network with Point-to-Site Connectivity
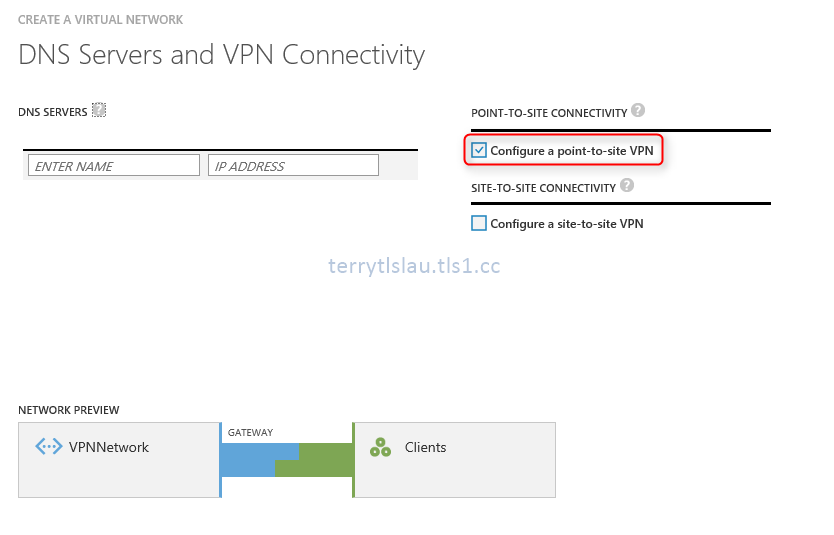
1. On Azure management portal, click "New > Network Services > Virtual Network > Custom Create".
I will use a IP address to connect a virtual machine on this virtual network so I don't enter any DNS servers information.
4. Click "Next" button.
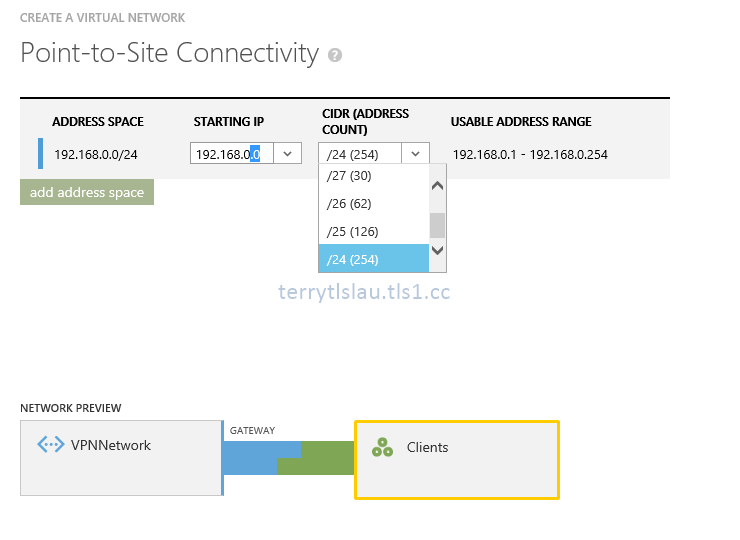
5. On "Point-to-Site Connectivity" window, you can only select private network because these IP will be assigned to VPN clients.
At this time, I select 192.168.0.0 IP address range for VPN clients.
6. Click "Next" button.
7. On "Virtual Network Address Spaces" window, I choose 10.0.0.0/8 Address Space. Then, I create a subnet which is 10.0.1.0/24 for virtual machine and I also added 10.0.0.0 /29 to this virtual network to be a subnet gateway.
According to Microsoft, gateway service that we run to enable cross-premises connectivity. We need 2 IP addresses from your routing domain for us to enable routing between your premises and the cloud. We require you to specify at least a /29 subnet from which we can pick IP addresses for setting up routes.
Please note that you must not deploy virtual machines or role instances in the gateway subnet.
8. Click "Finish" button.
Create a dynamic routing gateway in VPNNetwork
1. On "VPNNetwork" page, click "Create Gateway" button.
2. Click "Yes" to create.
Then, we can see the notification about creating a gateway on Microsoft Azure Portal. It needs to take about 20 minutes to create a gateway for this virtual network.
Additional information: One of my virtual network stopped at this screen on Microsoft Azure portal. I cannot remove that network at this moment by Portal or PowerShell. Make sure you don't make any change when the gateway is being created.
Then, the gateway IP address is ready.
Generate a root certificate and upload certificate to the virtual network
If the workstation has been installed Microsoft Visual Studio Express 2013 for Windows Desktop, makecert.exe is located at the following paths.
Generate a root certificate and upload certificate to the virtual network
If the workstation has been installed Microsoft Visual Studio Express 2013 for Windows Desktop, makecert.exe is located at the following paths.
1. On the Command Prompt, navigate to the "C:\Program Files (x86)\Windows Kits\8.1\bin\x64".
2. Perform makecert -sky exchange -r -n "CN=<Root Cert CN Name>" -pe -a sha256 -len 4096 -ss My "<File path to save the root certificate>" to create a root certificate which is used sha256 algorithm with 4096 key length and then save the file to C:\VPNNetworkRoot.cer
Make sure perform makecert as an administrator Command Prompt. If not, you get the following error message.
Error: WriteFile failed => 0x5 (5)
Failed
3. On "VPNNetwork" page, select "Certificates".
4. Click "Upload a Root Certificate".
Generate a client certificate to connect the Microsoft Azure Virtual network
We're going to use the same workstation to generate the client certificate for VPN connection. Actually, you don't need to install Microsoft Visual Studio Express 2013 for Windows Desktop to all VPN clients. Microsoft Visual Studio Express 2013 for Windows Desktop is applied to generate the root and client certificates. It's okay to assign 1 workstation for generating certificates. In my lab environment, I used the workstation to do both tasks.
To generate a client certificate, make sure you have installed root certificate on the same computer.
1. On Windows 10 workstation, perform makecert.exe -n "CN=<VPN client CN name>" -pe -sky exchange -m 96 -ss My -in "<Root cert name>" -is my -a sha256 to generate a client certificate which is used sha256 algorithm.
Then, you can find this client certificate in certificate console.
We can export this client certificate and then import it into another computer which will connect to Microsoft Azure Network. In my lab, I don't need to export this certificate.
Download and install VPN client configuration package
On the network page of Azure portal, we can download the VPN client configuration package.
1. Run the package.
2. Click "Yes" to install.
Then, you can find the VPN connection on your network setting of the computer.
Verify the result
1. Click the VPNNetwork, select Connect.
2. On VPNNetwork dialog box, click "Connect".
3. Perform ipconfig in the command prompt to verify the result
As a result, the workstation got the IP address 192.168.0.2. Now, it can connect to VPNNetwork which is locate in Microsoft Azure Virtual Network.
Remark: If there is no certificate in the computer, you get this message when click Connect on the dialog box.
A certificate could not be found that can be used with this Extensible Authentication Protocol. (Error 798)
Additional information
Keith Mayer, Senior Technical Architect at Microsoft, wrote a post about how to revoke the point to site VPN certificate. You can read the following blog post for your information.
This posting is provided “AS IS” with no warranties, and confers no rights!


No comments:
Post a Comment