Windows Server 2012 supported to use a single Server Manager console to manage multiple remote servers, Windows Server 2012, Windows Server 2008 R2, Windows Server 2008 and Windows Server 2003. Microsoft said that 1 console can be managed up to 100 servers that are configured with a typical workload.
Remark: Server Manager of Windows Server 2012 only can receive online or offline status of Windows Server 2003.
Enable and Disable remote management settings on Windows Server 2012
We can enable or disable the remote management settings by Server Manager or Command, "Configure-SMRemoting".
1. On a server, log in as Administrator.
2. Launch "Server Manager".
3. Click "Local Server".
4. Next to "Remote management", click "Enabled".

5. Clear "Enable remote management of this server from other computers".

6. Click "OK".
Now, the "Remote management" is disabled.

7. Launch "Command Prompt" as administrator.
8. Perform "Configure-SMRemoting -Get" to verify the remote management setting of MS01.
9. Perform "Configure-SMRemoting -Enable" to enable it.
You can also perform "Configure-SMRemoting -Disable" in Command Prompt of servers to disable remote management.
Configuring Remote Server Management on workgroup environment
To add and manage servers in workgroup environment, we need to perform the following steps.
Prerequisites
1) 2 servers named MS01 and MS02 are in workgroup environment
2) The IP addresses of MS01 and MS02 are 192.168.2.11 and 192.168.2.12 in my lab environment
Goal
Using Server Manager of MS01 manages MS02.
1. On MS01, log in as Administrator.
2. Launch "PowerShell" as administrator.
3. Perform "Set-Item wsman:\localhost\Client\TrustedHosts MS02 -Concatenate -Force" to add MS02 to a trusted host file in MS01.
4. Go to MS02, log in as Administrator.
5. Launch "Windows Firewall with Advanced Security".
6. Right-click "Inbound Rules", select "New Rule".
7. On "New Inbound Rule Wizard" window, select "Predefined > Windows Remote Management".

8. Click "Next".
9. On "Predefined Rules" window, check "Windows Remote Management (HTTP-In) - Profile Domain, Private".

10. Click "Next".
11. On "Action" window, select "Allow the connection".

12. Click "Finish".
Remark: Make sure MS02 is in Private network.

13. Launch "PowerShell" and perform "New-ItemProperty -Name LocalAccountTokenFilterPolicy - Path HKLM:\SOFTWARE\Microsoft\Windows\CurrentVersion\Policies\System -PropertyType DWord -Value 1" to override the UAC settings for remote management in workgroup environment.

To better protect those users who are members of the local Administrators group, we implement UAC restrictions on the network, This mechanism helps prevent against "loopback" attacks. This mechanism also helps prevent local malicious software from running remotely with administrative rights.
Reference:
14. Back to MS01, launch "Notepad".
15. Enter "MS02" in "Notepad".
16. Save as "C:\ManageServer.txt".

17. Launch "Server Manager".
18. Click "Add other servers to manage".

19. On "Add Servers" window, click "Import".
20. Next to "File", click "..." to import the server list.

21. Open "C:\ManageServer.txt".

22. Select "MS02" and then click ">" icon.

23. Click "OK".
Remark: If a server, remote or managed, is on a different subnet, you need to use FQDN of the server to connect it.
24. On left pane, click "All Servers".

Now, you can manage MS02 by Server Manager of MS01.
Remark: If you get "Refresh failed" on Server Manager, it may the Administrator's password of both servers isn't synced.

Test result
1. On Server Manager of MS01, right-click "MS02" and then select "Add Roles and Features".

2. On "Before You Begin" window, click "Next" four times.
3. On "Features" window, check "Telnet Client".
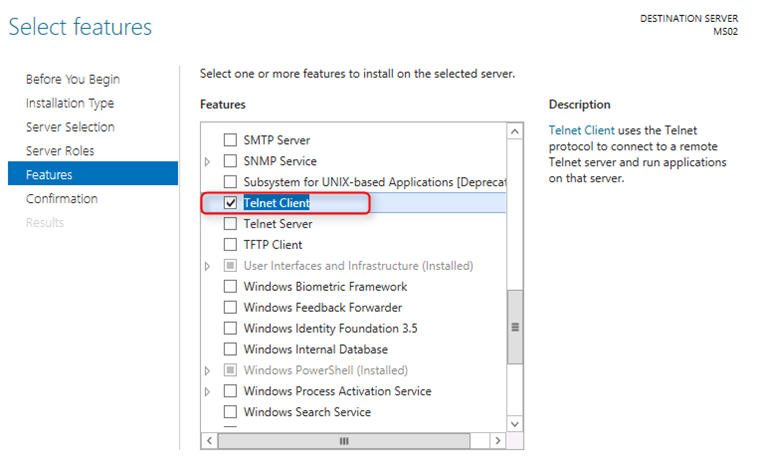
4. Click "Next".
5. On "Confirmation" window, click "Install".
6. On "Results" window, click "Close".

7. Launch "PowerShell" as administrator.
8. Perform "Enter-PSSession -ComputerName MS02" to enter the remote session of MS02.
9. Perform "Get-WindowsFeature -Name "telnet*".

10. Perform "Remove-WindowsFeature Telnet-Client" to remove telnet client in MS02.

As a result, we can use Server Manager and PowerShell to manage MS02.
This posting is provided “AS IS” with no warranties, and confers no rights!
Thanks for this step by step process, I followed it all get solutions for my own Windows server management. How I can processed for Linux server management and administration? Waiting for your reply.
ReplyDeleteHello,
DeletePlease read the following web site for your information.
http://powershell.org/wp/forums/topic/executing-powershell-scripts-from-linux-servers/