System Center Virtual Machine Manger 2012 or later can manage a NAS, SAN and File server. After connecting to a SAN or iSCSI storage, administrators can assign it to a Hyper-V host through System Center Virtual Machine Manger 2012 or later.
VMM uses SMAPI to manage external storage by using SMP, or users SMAPI together with the Microsoft Standards-based Storage Management Service to communicate with storage that is compliant with the Storage Management Initiative Specification (SMI-S). The new Windows Standards-Based Storage Management service replaces the Microsoft Storage Management Service in System Center 2012 - Virtual Machine Manager (VMM), and is an optional server feature that enables communication with SMI-S storage providers. It is enabled during installation of System Center 2012.
Quote from "Configuring Storage in VMM"
In the following lab, I will enable an iSCSI target function in a Windows Server 2012 R2 server and then manage it by System Center Virtual Machine Manager 2012 R2.
Goal

Lab
Enabling iSCSI target on SS02
1. On SS02, log in as Domain Administrator.
2. Launch "Server Manager".
3. Click "Add roles and features".

4. On "Before You Begin" window, click "Next".
5. On "Installation Type" window, select "Role-based or feature-based installation".

6. Click :Next".
7. On "Server Selection" window, click "Next".

8. On "Server Roles" window, expand "File and Storage Services > File and iSCSI Services", check "iSCSI Target Server".
9. On "Add features that are required for iSCSI Target Server" window, click "Add Features".


10. Click "Next".
11. On "Features" window, click "Next".

12. On "Confirmation" window, click "Install".

13. On "Results" window, click "Close".
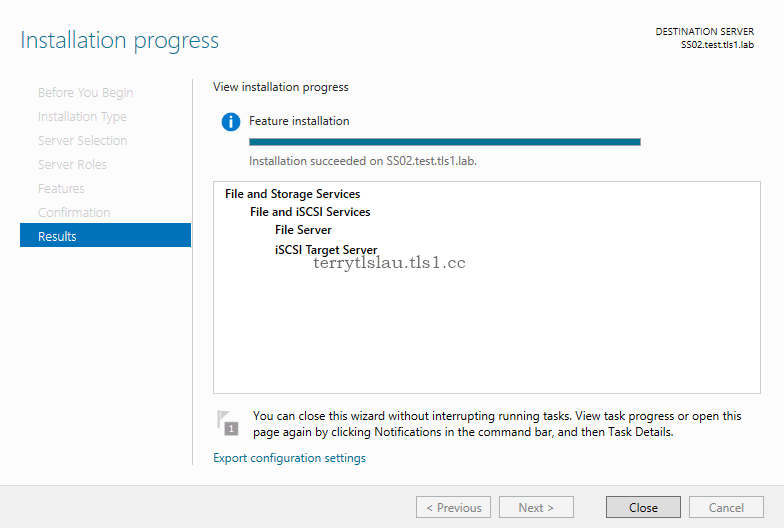
Remark: Administrators can perform "Install-WindowsFeature FS-iSCSITarget-Server" to install iSCSI target Server on a server.

14. Launch "Computer Management".
15. Expand "System Tools > Local Users and Groups > Groups".

16. Double-click "Administrators" group.
17. On "Administrators Properties" window, add "SCVMM Admins" for installing a VMM agent in SS02.

18. Click "OK".
19. Close "Computer Management".
Adding iSCSI target in VMM console
1. On VMM01, log in as VMMAdmin.
2. Launch "Virtual Machine Manager Console".
3. Log in with "Use current Microsoft Windows session identity" option.

4. On "Virtual Machine Manager Console", select "Fabric".

5. On "Fabric" pane, select "Storage".

6. On the menu, click "Add Resources > Storage Devices".

7. On "Select Provider Type" window, select "SAN and NAS devices discovered and managed by a SMI-S provider".

8. Click "Next".
9. On "Specify Discovery Scope" window, next to "Protocol", select "SMI-S WMI" for Windows based iSCSI target.
10. Next to "Provider IP address or FQDN", enter "ss02.test.tls1.lab".
11. Next to "Run As account" click "Browse" and then select "VMMAdmin".

12. Click "Next".
13. On "Gather Information" window, click "Next".

14. On "Select Storage Devices" window, click "Create classification".

15. On "New Classification" window, next to "Name", enter "Bronze Tier".

16. Click "Add".
17. Check "iSCSITarget: SS02: C:".
18. Next to "Classification", select "Bronze Tier".

19. Click "Next".
20. On "Summary" window, click "Finish".

Remark: Administrators can click "View Script" to check the PowerShell cmdlets of adding storage. Using PowerShell script, administrators can assign a new name for this storage array.

Creating a logical unit
1. On "Fabric" pane, next to the menu, click "Create Logical Unit".

2. On "Create Logical Unit" window, next to "Storage Pool", select "iSCSITarget: SS02: C:".
3. Next to "Name", enter "Lun01".
4. Next to "Size", change to "2".

5. Click "OK".
Remark: By default, the logical unit is created in "Fixed" provision type for Windows Server 2012 R2 iSCSI target by the wizard of System Center Virtual Machine Manager 2012 R2. To change the provision type, administrators can perform PowerShell script to create a logical unit.

6. On "Virtual Machine Manager Console", click "Classifications and Pools".

7. Expand "iSCSITarget: SS02: C:".
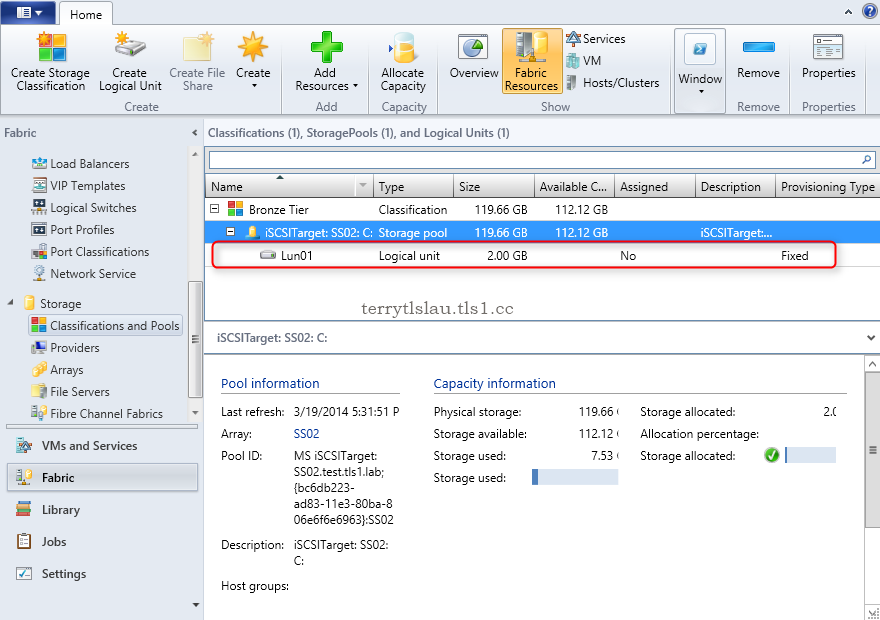
The "Lun01" was created in "Fixed" provision type in SS02 C drive.

Assigning the existing logical unit to HV02
Administrators can assign the existing logical unit to a Hyper-V host, Hyper-V cluster or a Host group.
1. On "Fabric" pane, click "Allocate Capacity".

2. On "Allocate Storage Capacity" window, click "Allocate Logical Units".

3. On "Allocate Logical Units" window, select "SS02" and then click "Add".


4. Click "OK".
5. On "Allocate Storage Capacity" window, click "Close".
6. On "Fabric" pane, next to "Servers > All Hosts".

7. Select "hv02", make sure is under "Host" tab, click "Properties".

8. On "hv02.test.tls1.lab Properties" window, select "Storage".

9. Click "Add > Add iSCSI Array".

Remark: Make sure the "Microsoft iSCSI Initiator Service" has been started before add iSCSI Array.
5. On "Create New iSCSI Session" window, next to "Array", select "SS02".

6. Click "Create".
7. Click "Add > Add Disk".


8. Change the "Classification" to "Bronze Tier".
9. Change the drive letter, "Z".

10. Click "OK".
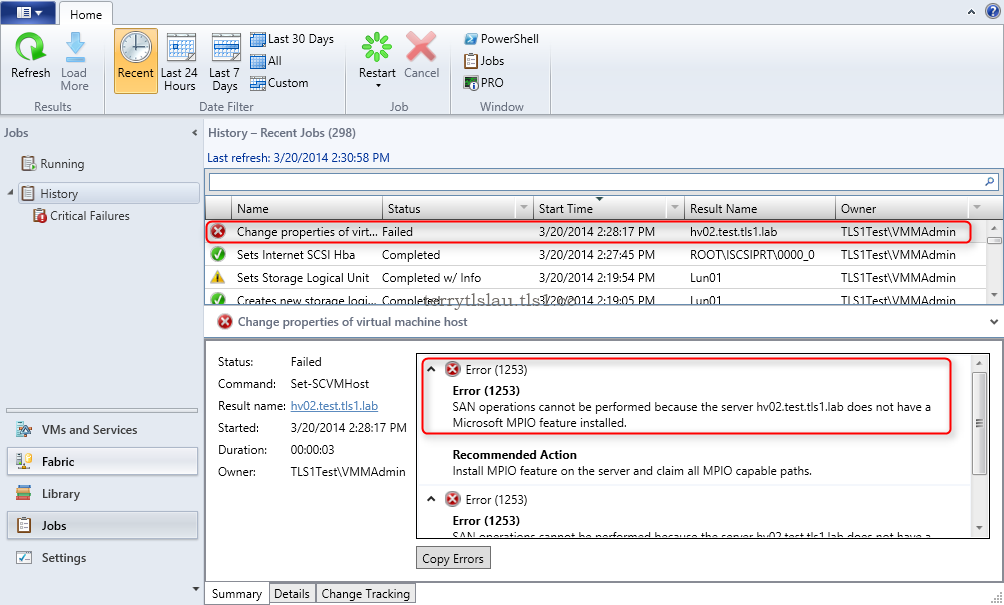
Remark: If the MPIO feature isn't enabled in a Hyper-V host, administrators discovers this error.
Error (1253)
SAN operations cannot be performed because the server hv02.test.tls1.lab does not have a Microsoft MPIO feature installed.
11. Select "hv02", make sure is under "Host" tab, click "Properties".
12. On "hv02.test.tls1.lab Properties" window, select "Storage".

As a result, the logical unit was added in HV02.
Remark: Administrators can create a logical unit in "Storage" tab after select "Allocate Storage Pools" for a Host Group.


Added iSCSI Arrays, administrators can click "Create Logical Unit" to create a logical unit.

More information:
VMM uses SMAPI to manage external storage by using SMP, or users SMAPI together with the Microsoft Standards-based Storage Management Service to communicate with storage that is compliant with the Storage Management Initiative Specification (SMI-S). The new Windows Standards-Based Storage Management service replaces the Microsoft Storage Management Service in System Center 2012 - Virtual Machine Manager (VMM), and is an optional server feature that enables communication with SMI-S storage providers. It is enabled during installation of System Center 2012.
Quote from "Configuring Storage in VMM"
In the following lab, I will enable an iSCSI target function in a Windows Server 2012 R2 server and then manage it by System Center Virtual Machine Manager 2012 R2.
Goal
- Enabling iSCSI target on a server
- Discovering iSCSI target and creating a classification of storage in System Center Virtual Machine Manager 2012 R2
- Creating a logical unit through System Center Virtual Machine Manager 2012 R2
- Adding a SCSI Array to a Hyper-V host through System Center Virtual Machine Manager 2012 R2
- Assigning a logical unit to a Hyper-V host
Prerequisites
- The domain environment has been set up. If you would like to know how to prepare a domain, please read Dcpromo on Windows Server 2012
- System Center Virtual Machine Manager 2012 R2 has been installed in a server which is named VMM01. For the detail steps, please read Installing System Center Virtual Machine Manager 2012 R2 in Windows Server 2012 R2
- Enabling "Multipath I/O" in a Hyper-V host, SS02
Lab environment
This lab environment which is included accounts and server names is based on "Installing System Center Virtual Machine Manager 2012 R2 in Windows Server R2".
Computer Name: DC01.test.tls1.lab
Server Roles: Domain Controller and DNS Server
Operating System: Windows Server 2012 R2
Computer Name: VMM01.test.tls1.lab
Server Roles: VMM management server
Operating System: Windows Server 2012 R2
Computer Name: HV02.test.tls1.lab
Server Roles: Hyper-V host
Operating System: Windows Server 2012 R2
Computer Name: SS02.test.tls1.lab
Server Roles: iSCSI target server with only 1 hard disk
Operating System: Windows Server 2012 R2
Lab
Enabling iSCSI target on SS02
1. On SS02, log in as Domain Administrator.
2. Launch "Server Manager".
3. Click "Add roles and features".
5. On "Installation Type" window, select "Role-based or feature-based installation".
7. On "Server Selection" window, click "Next".
9. On "Add features that are required for iSCSI Target Server" window, click "Add Features".
11. On "Features" window, click "Next".
15. Expand "System Tools > Local Users and Groups > Groups".
17. On "Administrators Properties" window, add "SCVMM Admins" for installing a VMM agent in SS02.
19. Close "Computer Management".
Adding iSCSI target in VMM console
1. On VMM01, log in as VMMAdmin.
2. Launch "Virtual Machine Manager Console".
3. Log in with "Use current Microsoft Windows session identity" option.
9. On "Specify Discovery Scope" window, next to "Protocol", select "SMI-S WMI" for Windows based iSCSI target.
10. Next to "Provider IP address or FQDN", enter "ss02.test.tls1.lab".
11. Next to "Run As account" click "Browse" and then select "VMMAdmin".
13. On "Gather Information" window, click "Next".
17. Check "iSCSITarget: SS02: C:".
18. Next to "Classification", select "Bronze Tier".
20. On "Summary" window, click "Finish".
1. On "Fabric" pane, next to the menu, click "Create Logical Unit".
3. Next to "Name", enter "Lun01".
4. Next to "Size", change to "2".
Remark: By default, the logical unit is created in "Fixed" provision type for Windows Server 2012 R2 iSCSI target by the wizard of System Center Virtual Machine Manager 2012 R2. To change the provision type, administrators can perform PowerShell script to create a logical unit.
Administrators can assign the existing logical unit to a Hyper-V host, Hyper-V cluster or a Host group.
1. On "Fabric" pane, click "Allocate Capacity".
5. On "Allocate Storage Capacity" window, click "Close".
6. On "Fabric" pane, next to "Servers > All Hosts".
5. On "Create New iSCSI Session" window, next to "Array", select "SS02".
7. Click "Add > Add Disk".
9. Change the drive letter, "Z".
Remark: If the MPIO feature isn't enabled in a Hyper-V host, administrators discovers this error.
Error (1253)
SAN operations cannot be performed because the server hv02.test.tls1.lab does not have a Microsoft MPIO feature installed.
12. On "hv02.test.tls1.lab Properties" window, select "Storage".
Remark: Administrators can create a logical unit in "Storage" tab after select "Allocate Storage Pools" for a Host Group.
Configuring Storage in VMM
How to Configure Storage on a Hyper-V Host in VMM
Confiugring iSCSI target on Windows Server 2012
How to Configure Storage on a Hyper-V Host in VMM
Confiugring iSCSI target on Windows Server 2012
This posting is provided “AS IS” with no warranties, and confers no rights!
No comments:
Post a Comment