In System Center Virtual Machine Manager 2012 or later, it is available to add "Windows Server Update Service" to System Center Virtual Machine Manager. Administrator can determine install "Windows Server Update Service" to the same server which is installed System Center Virtual Machine Manager management server or a separate server. Microsoft suggested installing "Windows Server Update Service" to a separate server if there are a lot of computers which are manager by VMM management server. Adding "Windows Server Update Service" to a VMM management server, administrators can use it to apply the Windows Updates for Hyper-V Hosts, Library servers, PXE servers, the Windows Server Update Services servers and VMM management servers. The Windows Updates can be centralized to manage and apply to all servers which are providing the virtualization services.
Goals
First of all, I will install "Windows Server Update Service" on SUS01.
1. On SUS01, log in as VMMAdmin.
2. Launch "Server Manager".
3. Click "Add roles and features".

4. On "Before You Begin" window, click "Next".
5. On "Installation Type" window, select "Role-based or feature-based installation".

6. Click "Next".
7. On "Server Selection" window, click "Next" twice.
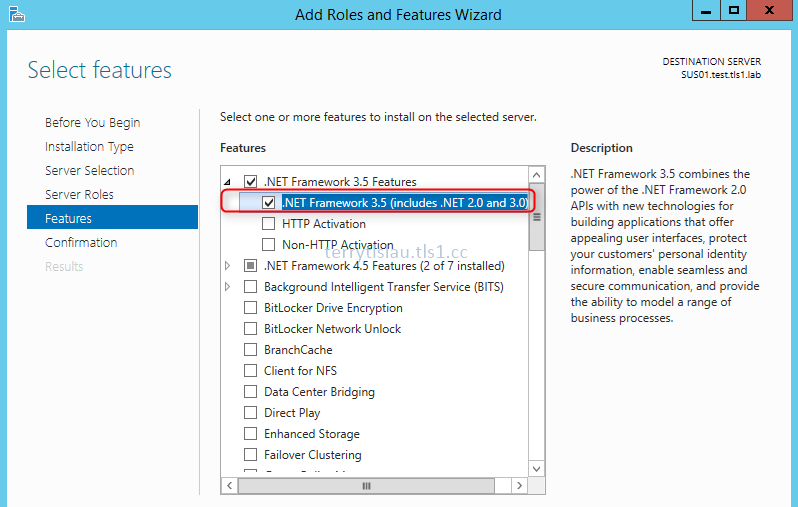
8. On "Features" window, check ".NET Framework 3.5 (Includes .NET 2.0 and 3.0)".
9. Click "Next".
10. On "Confirmation" window, click "Install".

Remark: Make sure SUS01 connected to the network and access the Internet. If not, administrators have to provide the source for installing ".NET Framework 3.5 (Includes .NET 2.0 and 3.0)". For more information, please read "Installing Microsoft .NET Framework 3.5 in Windows Server 2012 or R2 by Windows Server installation disk".
11. When installation finish, double-click "ReportViewer" in C:\ to install "Microsoft Report Viewer 2008 SP1 Redistriutable".

12. Back to "Server Manager", click "Add roles and features".
13. On "Before You Begin" window, click "Next" three times.
14. On "Server Roles" window, check "Windows Server Update Services".
15. On "Add roles and Features Wizard", click "Add Features".


16. Click "Next" twice.
17. On "Web Server Roles (IIS)" window, click "Next".

18. On "Role Services" window, click "Next".

By default, all required components have been checked. Administrators don't need to modify it.
19. On "Windows Server Update Services" window, click "Next".

20. On "Select role services" window, administrators can select to use Windows internal database or existing SQL server to store computers information of "Windows Server Update Services". In my lab environment, I select "Database" which is store computers information to existing SQL server.

21. Click "Next".
22. On "Content" window, next to "Store updates in the following location", enter "C:\SUSUpdate".

23. Click "Next".
24. On "DB Instance" window, next to "Specify an existing database server", enter "DB01".
25. Click "Check connection".

Make sure "Successfully connected to server" is displayed.
Remark: VMMAdmin is a dbcreator and securityadmin of SQL Server 2012 in DB01.

26. Click "Next".
27. On "Confirmation" window, click "Install".
28. When installation finished, click "Launch Post-Installation tasks" to perform "Post-Installation tasks".

"Post-Installation tasks" will create a database in a SQL server and configure the WSUS.
29. Click "Close".
30. Click the flag on "Server Manager", make sure "Post-deployment Configuration" completed.

Perform initial configuration of "Windows Server Update Service"
1. Launch "Windows Server Update Service" console.
2. On "Before You Begin" of "Windows Server Update Services Configuration Wizard" window, click "Next".

3. On "Microsoft Update Improvement Program" window, click "Next".
4. On "Choose Upstream Server" window, select "Synchronize from Microsoft Update", click "Next".

5. On "Specify Proxy Server" window, click "Next".

6. On "Connect to Upstream Server" window, click "Start Connecting".

7. Click "Next".
8. On "Choose Languages" window, select languages of Windows updates to download to your server. In my lab environment, I checked "English" only.

9. Click "Next".
10. On "Choose Products" window, select the products. Basically, we need to "System Center 2012 R2 - Virtual Machine Manager" and "Windows Server 2012 R2" product. We don't need to select the other products.


11. Click "Next".
12. On "Choose Classifications" window, I'd like to make it simple. Check "Critical Updates" and "Security Updates". These are the basic update for Windows Servers. Administrators also can consider downloading "Update Rollups" and "Updates" for Windows Servers and System Center Virtual Machine Manager.

13. Click "Next".
14. On "Configure Sync Schedule" window, select "Synchronize manually".

15. Click "Next".
16. On "Finished" window, check "Begin initial synchronization".

17. Click "Next".
18. On "What's Next" window, click "Finish".

The "Windows Server Update Service" is synchronizing the update.

Installing "Windows Server Update Service" administration console on VMM management server
1. On VMM01, log in as VMMAdmin.
2. Launch "PowerShell" as administrator.
3. Perform "Install-WindowsFeature UpdateServices-UI -IncludeManagementTools" to install "Windows Server Update Service" administration console.

4. Perform "Restart-Service SCVMMService -PassThru" to restart the "System Center Virtual Manager".

After installing "Windows Server Update Service" administration console, administrators have to restart the "SCVMMService". If you are using a highly available VMM management server with a remote WSUS server, you must install a WSUS administration console on each node of the cluster.
Quote from How to Install a WSUS Server for VMM
Adding an Update server to SCVMM
1. On VMM01, log in as VMMAdmin.
2. Launch "Virtual Machine Manager Console".
3. Select "Use current Microsoft Windows session identity", click "Connect".

4. On "Virtual Machine Manager Console", select "Fabric".
5. Select "Infrastructure > Update Server".

6. On "Home" tab, click "Add Resources > Update Server".

7. On "Add Windows Server Update Services Server" window, next to "Computer name", enter "SUS01".
8. Next to "TCP/IP port", enter "8530".
9. Select "Use an existing Run As account", click "Browse" to select "VMM Admin".

10. Click "Add".
11. Select "Jobs".

VMM management server is deploying a VMM agent to SUS01.
12. Select "Fabric".

The update server was added in VMM console. Administrators don't need to use WSUS administration console to manage update server. Administrators can directly manage this update server by VMM.
13. Right-click "SUS01", select "Properties".

14. We can update the "Windows Server Update Service" settings through this properties.


15. Click "Cancel".
As a result, the update server was added to VMM management server.
More information
How to Install a WSUS Server for VMM
How to Add an Update Server to VMM
Goals
- Install a Windows Server 2012 R2 named SUS01 to provide "Windows Server Update Service"
- Add SUS01 into a fabric in VMM
Lab environment
The lab environment is based on "Installing System Center Virtual Machine Manager 2012 R2 in Windows Server 2012 R2". Mainly, I will use "VMM01" and "SUS01" to complete this lab.
Prerequisites
- Add "SUS01" as a domain member of "test.tls1.lab"
- Add "VMMAdmin" as a local administrator of "SUS01" server
- Download "Microsoft Report Viewer 2008 SP1 Redistributable" on C:\ of "SUS01"
Lab
Installing "Windows Server Update Service"First of all, I will install "Windows Server Update Service" on SUS01.
1. On SUS01, log in as VMMAdmin.
2. Launch "Server Manager".
3. Click "Add roles and features".
5. On "Installation Type" window, select "Role-based or feature-based installation".
7. On "Server Selection" window, click "Next" twice.
8. On "Features" window, check ".NET Framework 3.5 (Includes .NET 2.0 and 3.0)".
10. On "Confirmation" window, click "Install".
11. When installation finish, double-click "ReportViewer" in C:\ to install "Microsoft Report Viewer 2008 SP1 Redistriutable".
13. On "Before You Begin" window, click "Next" three times.
14. On "Server Roles" window, check "Windows Server Update Services".
15. On "Add roles and Features Wizard", click "Add Features".
17. On "Web Server Roles (IIS)" window, click "Next".
19. On "Windows Server Update Services" window, click "Next".
22. On "Content" window, next to "Store updates in the following location", enter "C:\SUSUpdate".
24. On "DB Instance" window, next to "Specify an existing database server", enter "DB01".
25. Click "Check connection".
Remark: VMMAdmin is a dbcreator and securityadmin of SQL Server 2012 in DB01.
27. On "Confirmation" window, click "Install".
28. When installation finished, click "Launch Post-Installation tasks" to perform "Post-Installation tasks".
29. Click "Close".
30. Click the flag on "Server Manager", make sure "Post-deployment Configuration" completed.
1. Launch "Windows Server Update Service" console.
2. On "Before You Begin" of "Windows Server Update Services Configuration Wizard" window, click "Next".
4. On "Choose Upstream Server" window, select "Synchronize from Microsoft Update", click "Next".
8. On "Choose Languages" window, select languages of Windows updates to download to your server. In my lab environment, I checked "English" only.
10. On "Choose Products" window, select the products. Basically, we need to "System Center 2012 R2 - Virtual Machine Manager" and "Windows Server 2012 R2" product. We don't need to select the other products.
12. On "Choose Classifications" window, I'd like to make it simple. Check "Critical Updates" and "Security Updates". These are the basic update for Windows Servers. Administrators also can consider downloading "Update Rollups" and "Updates" for Windows Servers and System Center Virtual Machine Manager.
14. On "Configure Sync Schedule" window, select "Synchronize manually".
16. On "Finished" window, check "Begin initial synchronization".
18. On "What's Next" window, click "Finish".
1. On VMM01, log in as VMMAdmin.
2. Launch "PowerShell" as administrator.
3. Perform "Install-WindowsFeature UpdateServices-UI -IncludeManagementTools" to install "Windows Server Update Service" administration console.
Quote from How to Install a WSUS Server for VMM
Adding an Update server to SCVMM
1. On VMM01, log in as VMMAdmin.
2. Launch "Virtual Machine Manager Console".
3. Select "Use current Microsoft Windows session identity", click "Connect".
5. Select "Infrastructure > Update Server".
8. Next to "TCP/IP port", enter "8530".
9. Select "Use an existing Run As account", click "Browse" to select "VMM Admin".
11. Select "Jobs".
12. Select "Fabric".
13. Right-click "SUS01", select "Properties".
As a result, the update server was added to VMM management server.
More information
How to Install a WSUS Server for VMM
How to Add an Update Server to VMM
This posting is provided “AS IS” with no warranties, and confers no rights!
No comments:
Post a Comment