Showing posts with label Hyper-V. Show all posts

Thursday, November 10, 2016

Fixing NIC teaming which was created by onboard NICs after replace a motherboard

Symptom
After replacing a motherboard with same model,  when you check the current NIC teaming configuration on Server Manager. The NIC teaming is "Fault" status.


When you click properties, you got the "stopping working" windows.


Cause
The virtual NICs of blade server were changed. The NIC teaming doesn't know you changed the hardware.
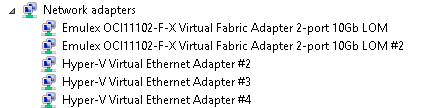
Before

After


Resolution
1. Launch PowerShell to remove the current NIC teaming.


2. Update the VMSwitch to point to this new NIC teaming by performing Set-VMSwitch.

This posting is provided “AS IS” with no warranties, and confers no rights!

Tuesday, April 12, 2016

Hybrid IT Management course from Microsoft Virtual Academy (MVA)

There is a series on Microsoft Virtual Academy (MVA) to talk about Hybrid IT Management. There are 2 parts with 20 sessions in it. These are the following will be covered in Part 1 and Part 2.

Part 1
1. Introducing Hybrid IT Management
2. Getting Started
3. Deployment Options
4. Solutions
5. Logs and Near Real-Time Performance Data Collection
6. Search and Customizations
7. Security Analytics
8. Recommended Resources and Next Steps

Part 2
1. Introducing Hybrid IT Management
2. Introducing Azure Backup
3. IaaS Backup
4. Hybrid Cloud Backup with Microsoft Azure Backup Server
5. Integrating System Center Data Protection Manager and Azure Backup
6. System Center Data Protection Manager Overview
7. Introduction to Azure Site Recovery
8. VMware and Physical to Azure
9. Hyper-V to Azure
10. Site-to-Site DR with Azure Site Recovery and Hyper-V Replica
11. Site-to-Site DR with Azure Site Recovery and SAN Replication
12. Site-to-Site DR for VMware with Azure Site Recovery
13. Workload Support and Capacity Planning
14. Summary and Resources

Please go to the following web sites to watch these series.


This posting is provided “AS IS” with no warranties, and confers no rights!

Monday, December 7, 2015

Migrate Windows Server 2012 R2 Hyper-V cluster to another domain

Recently, I did a migration task to migrate a Windows Server 2012 R2 Hyper-V cluster with Cluster Shared Volume to another domain. To migrate Hyper-V Cluster with Virtual Machines, it took some down time for the virtual machines during the migration. By the way, I would like to make high level steps what I did in this migration for reference.

Current Hyper-V cluster environment
  • 2 nodes Windows Server 2012 R2 Hyper-V Cluster with Cluster Shared Volumes from A domain
  • Some virtual machines are under this Hyper-V Cluster
Goal
  • Migrate these 2 nodes Hyper-V Cluster to B domain
  • Keep the same computer names of the Hyper-V Hosts

High level steps
  • Take screen captures of the folder structures under CSVs
  • Create a temp local administrator accounts on Hyper-V hosts (optional)
  • Perform live migration to move all VMs to the second Hyper-V host in the current Hyper-V cluster
  • Move all CSVs to the second Hyper-V host in the current Hyper-V cluster
  • Move the cluster core resources to other Hyper-V hosts which are in the same clusters
At the current state, all cluster related resources were moved to the second host
  • Evict a node which is no cluster resource from the existing Hyper-V Cluster
  • Clear the cluster configuration on the evicted node by performing Clear-ClusterNode -Name <evicted node name> -Force
  • Remove the Failover Cluster role on the evicted node and then restart the computer
  • Update the IP addresses of all NICs on the evicted node and then join B domain
  • Install Failover Cluster Role and then create a new cluster
  • Shut down all VMs on the Hyper-V Cluster of A domain
  • Remove all VMs from Failover Cluster Manager
  • Take all CSVs offline
  • Remove all CSVs from Hyper-V Cluster of A domain
  • Destroy the Hyper-V Cluster of A domain
  • Clear the cluster configuration on the last node of Hyper-V cluster by performing Clear-ClusterNode -Name <evicted node name> -Force
After removing the Hyper-V Cluster of A domain, the VM configurations still keep in the last Hyper-V host with "Off-Critical" state.

  • Remove the Failover Cluster role on the last node and then restart the computer
  • Bring quorum disk online and then format it as NTFS format on the Hyper-V host of B domain
  • Add the quorum disk and the change the quorum setting to Node and Disk witness on the Hyper-V Cluster of B domain
  • Add other disks on the Hyper-V Cluster of B domain

At the lower pane, you can find the name of the cluster disks.

  • Convert the disks in the same sequence of previous Hyper-V Cluster to CSV.
  • Update the IP addresses of all NICs on the last node and then join B domain
  • Install Failover Cluster Role and then on the second nodes to the new Hyper-V Cluster
  • Click "Configure Role" to convert all VMs to high availability in the new Hyper-V Cluster

  • Perform cluster validation test before bring all VMs online
  • Update the delegation Kerberos settings on Active Directory of B domain for live migration
  • Perform some Failover test on the Hyper-V Cluster of B domain
Additional information:
You might find the warning message on the new cluster because the local cluster account, CLIUSR, wasn't deleted during remove the server role. To solve this issue, you can delete the CLIUSR user account manually. Then, restart the Hyper-V host.

Other reference for Hyper-V cluster migration:
This posting is provided “AS IS” with no warranties, and confers no rights!

Monday, November 23, 2015

Enable nested virtualiztaion on Windows Server 2016 TP4 or Windows 10

In Windows 10 build version 10586 and Windows Server 2016 Technical Preview 4, Microsoft added nested virtualization on Hyper-V. We can enable Hyper-V feature on a virtual machine which is installed Windows Server 2016 TP4 or Windows 10 build 10586. The build versions prior to Windows Server 2016 TP4 or Windows 10 build 10586. It doesn't work. At this moment, there are some limitations on a virtual machine which will be enabled Hyper-V feature.
  • Dynamic memory must be off
  • Runtime memory resize doesn't support (Windows Server 2016 Hyper-V new feature)
  • Checkpoint doesn't support
  • Live migration doesn't support
  • Save or Restore of a virtual machine doesn't support
There are some requirements to use nested virtualization.
  • Once nested virtualization is enabled in a VM, MAC spoofing must be enabled for networking to work in its guests
  • Hosts with Device Guard enabled cannot expose virtualization extensions to guests. You must first disable VBS in order to preview nested virtualization
  • Hosts with Virtualization Based Security (VBS) enabled cannot expose virtualization extensions to guests. You must first disable VBS in order to preview nested virtualization
  • This feature is currently Intel-only. Intel VT-x is required
  • Beware: nested virtualization requires a good amount of memory. I managed to run a VM in a VM with 4 GB of host RAM, but things were tight

To enable nested virtualization on a VM, we can perform Set-VMProcessor -VMName <VMName> -ExposeVirtualizationExtensions $True


or We can use a script which is provided by Microsoft to enable it.

The script will configure a virtual machine to fulfill the requirements like disabling Mac address spoofing, changing the memory size and so on.

Then, we can enable the Hyper-V feature on a VM.


Please try to use it and give some feedback to Microsoft.

More information:

This posting is provided “AS IS” with no warranties, and confers no rights!

Thursday, October 22, 2015

Windows Server 2016: Virtualization Deep Dive on Microsoft Virtual Academy (MVA) course

There is a new course on Microsoft Virtual Academy (MVA) to talk about Virtualization on Windows Server 2016. Windows Server 2016: Virtualization Deep Dive is hold by Matt McSpirit, Technical Evangelist, and Ben Armstrong, Principal Program Manager Lead, Hyper-V. If you are a big fan of Hyper-V, you must know Ben Armstrong. They talked about Hyper-V on Nano Server, Containers and other new features on Windows Server 2016 Virtualization. Don't miss this MVA course to learn what's new in Windows Server 2016 Virtualization.

This posting is provided “AS IS” with no warranties, and confers no rights!

Tuesday, October 13, 2015

Convert an existing virtual machine to a high availability virtual machine on Failover Cluster Manager

After configuring a Hyper-V cluster on Windows Server 2012 or Windows Server 2012 R2, we should use Failover Cluster Manager to create a high availability virtual machine. If we use Hyper-V Manager of one of cluster nodes, a virtual machine doesn't appear on Failover Cluster Manager because the virtual machine isn't high availability. 


Before converting an existing machine, make sure it stored on a shared path of the cluster.

1. To convert an existing virtual machine to a high availability virtual machine, Right-click Roles > Configure Role on Failover Cluster Manager.


2. On "Select Role" window, select Virtual Machine and then click Next.


3. In "Select Virtual Machine" window, check the virtual machine name and then click Next.


4. On "Confirmation" window, click Next.


5. On "Summary" window, click Finish.


As a result, the virtual machine has been converted to a high availability virtual machine within the cluster.


We can perform Get-VM <VMName> | Add-ClusterVirtualMachineRole to complete the above task in a same cluster node.


This posting is provided “AS IS” with no warranties, and confers no rights!

Thursday, June 18, 2015

'Virtual Machine' failed to start on Windows Server 2008 R2 Hyper-V

Many of Hyper-V administrators may get this error when power on a virtual machine.

'Virtual Machine name' failed to start. (Virtual Machine ID XXXXXXXX-XXXX-XXXX-XXXX-XXXXXXXXXXXX)

You can find the error event, ID 12030, on Hyper-V-Worker folder of Event Viewer but there is no more additional information. 

One of the reason that the virtual machine cannot be started up is there is not enough memory on the Hyper-V host to start up virtual machine. Many of you may know this answer. 

How come there is not enough memory?
I could start up the virtual machine normally.

One of my experience is the Hyper-V host might copy a large file and the cached the memory for hardware RAID controller. The Hyper-V host cached a lot of memory so I couldn't start up the virtual machine after power off.

To solve this issue, we can check how many memory is available on the host. Then, we can modify the start up memory size of the virtual machine which is less than the existing one. After that, try to power on the virtual machine.

It's not a new troubleshooting skill but we may forget it. That's why I'd like to share it.

Reference:

This posting is provided “AS IS” with no warranties, and confers no rights!

Wednesday, April 1, 2015

Read Hyper-V Event Log

Have you read a post, Looking at the Hyper-V Event Log, was written by Ben Armstrong, Principal Program Manager Lead, Microsoft?

Ben talked about what event logs can be found on event viewer. In Windows Server 2012 R2, there are the following categories.


Remark: There are some new categories in Windows Server 2012 and 2012 R2.

Hyper-V-Config:
This section is for anything that relates to virtual machine configuration files.  If you have a missing or corrupt virtual machine configuration file - there will be entries here that tell you all about it.

Hyper-V-High-Availability:
This section tells you about actions and changes that happen because of Hyper-V clustering.

Hyper-V-Hypervisor:
This section is used for hypervisor specific events.  You will usually only need to look here if the hypervisor fails to start - then you can get detailed information here.

Hyper-V-Image-Management-Service:
This section is used by the image management service to log information about virtual hard disk operations - like creating, converting and editing virtual hard disks.  If you have problems creating or editing a virtual hard disk - look here.

Hyper-V-Integration:
This section is used to log events that relate specifically to integration services.

Hyper-V-Network:
This section is used for events relating to virtual networks.  You will see information about the creation and configuration of virtual networks here (as opposed to virtual network adapters).

Hyper-V-SynthNic:
This is the section where information about virtual network adapters.  You will see entries in here each time a virtual machine with virtual network adapters powers up.  You will also see entries here if a virtual machine fails to power on because of a configuration issue with its network adapters.

Hyper-V-SynthStor:
This section is to do with virtual hard disks that are associated with running virtual machines (it is the storage equivalent of the SynthNic section).

Hyper-V-VMMS:
This section is where the virtual machine management services files its events.

Hyper-V-Worker:
This section is used by the worker process that is used for the actual running of the virtual machine.

Quote from Looking at the Hyper-V Event Log

Ben provided the troubleshooting tip like starting with Hyper-V-VMMS to trace the error message.

It's very useful for Hyper-V administrators to find out problems.

Additional information
Reading Hyper-V Event logs with PowerShell

This posting is provided “AS IS” with no warranties, and confers no rights!

Wednesday, December 31, 2014

Using Microsoft solutions to maintain Business Continuity

There is a new Microsoft Virtual Academy (MVA) course, Microsoft Business Continuity, which is talked about maintaining Business Continuity by Microsoft solutions. This course was hosted by Matt McSpirit, Senior Technical Product Manager and Symon Perriman, Senior Technical Evangelist. It included 4 modules in this course which are High Availability, Data Protection, Site Recovery and Site Recovery for Heterogeneous Environments. It covered some Microsoft products and features which are based on Windows Server 2012 R2, System Center 2012 R2 and Microsoft Azure. like Windows Failover Clustering, System Center Data Protection Manager (DPM), Microsoft Azure Site Recovery and Image Scout. Matt and Symon did some demonstrations to use these above products or features to maintain Business Continuity for Hyper-V and VMware environment.

If you are interested, please watch this MVA course.

This posting is provided “AS IS” with no warranties, and confers no rights!

Thursday, September 11, 2014

Failed to install Windows Server 2012 R2 a virutal machine on Windows Server 2012 R2 or Windows 8.1 Hyper-V

The minimum RAM requirement of Windows Server 2012 R2 is 512 MB. However, when we install Windows Server 2012 R2 on a virtual machine, you get the following error message.

Windows cannot find the Microsoft Software License Terms. Make sure the installation sources are valid and restart the installation.


According to System Requirements and Installation Information for Windows Server 2012 R2, we can do one of the the following to avoid this.
  • Allocate more than 800 MB RAM to the virtual machine you intend to install this release on. Once Setup has completed, you can change the allocation to as little as 512 MB RAM, depending on the actual server configuration.
  • Interrupt the boot process of this release on the virtual machine with SHIFT + F10. In the command prompt that opens, use Diskpart.exe to create and format an installation partition. Run Wpeutil createpagefile /path=C:\pf.sys (assuming the installation partition you created was C:). Close the command prompt and proceed with Setup.

This posting is provided “AS IS” with no warranties, and confers no rights!

Thursday, December 26, 2013

Disk2vhd v2.0

Microsoft released a new version of Disk2vhd on 19-Dec-2013. This version, v2.0, supports to capture the physical hard disk to vhdx or vhd file formats. If you are interested in this tool, please go the following web site download and try it.

Download link:

For more information:

This posting is provided “AS IS” with no warranties, and confers no rights!

Wednesday, September 4, 2013

Failed to apply "Enable bandwidth management" in Windows Server 2012 and Windows Server 2012 R2 Hyper-V

When I apply "Minimum bandwidth" of "Network Adapter" which is below 10 Mbps, I found an error message.

Error applying Network Adapter changes

The operation failed.

Failed while applying switch port settings 'Ethernet Switch Port Bandwidth Settings' on switch 'VMNet 08': One or more arguments are in valid (0x80070057)


Resolution
The "Minimum bandwidth" bases on the maximum bandwidth of physical NICs. For example, My Hyper-V server was installed the 1 Gbps NIC so the minimum unit is 1% (10 Mbps) of Maximum bandwidth of the physical NIC. Although private virtual switches don't connect to the physical NICs. It is also affected.
This posting is provided “AS IS” with no warranties, and confers no rights!

Monday, March 11, 2013

Restore Windows Server 2008 R2 Bare-metal backup to a VM

Last month, My workmate needed to restore Windows Server 2008 R2 Bare-Metal backup to a VMware workstation environment. By default, Windows Server 2008 R2 Bare-Metal backup restore to a VM, Hyper-V or VMware workatation, it will show "STOP: 0x0000007B" error.


Then, I searched and read a useful post, Restoring a Win7 Complete PC image in Hyper-V. The forum users provided solutions for Hyper-V and VMware workstation. I tried to show you the steps which are provided by this forum.

For Hyper-V
Assuming that the Bare-Metal backup was restored to a VM and you get the "STOP: 0x0000007B".

1. Insert Windows Server 2008 R2 DVD.
2. Boot from DVD-Rom.
3. On "Install Windows" screen, click "Next".

 
4. Click "Repair your computer".
 

5. Select "Use recovery tools that can help fix problems starting Windows. Select an operating system to repair.".


6. Click "Next".
7. Select "Command Prompt".


8. Perform "regedit" to start "Registry Editor".


9. Select "HKEY_LOCAL_MACHINE".
10. On the menu, click "File > Load Hive".


11. Navigate to "D:\Windows\System32\Config\SYSTEM".


Remark: Note that the restored Windows may be restored to another drive letter.

12. Click "Open".
13. Under "Key Name", type "Recovery".


14. Click "OK".
15. Navigate to "HKEY_LOCAL_MACHINE\Recovery\ControlSet001\services\intelide".
16. Double-click "Start".
17. Change the "Value data" to "0".


18. Click "OK".


Remark: I tried to modify this setting and then the Windows Server 2008 R2 can boot up in Hyper-V environment. If the above setting doesn't work, please change the following registry settings.

HKLM/System/CurrentControlSet/Services/<item below> and then the value of the "Start" parameter

Aliide = 3
Amdide =3
Atapi = 0
Cmdide = 3
iaStorV = 3
intelide = 0
msahci = 3
pciide = 3
viaide = 3


19. Navigate to "HKEY_LOCAL_MACHINE\Recovery".
20. On the menu, click "File > Unload Hive".


21. On "Confirm Unload Hive" window, click "Yes".


22. Close "Registry Editor".
23. On "System Recovery Options", click "Restart".


After restarted, the Windows Server 2008 R2 can boot up in a VM of Hyper-V.


For VMware workstation
Assuming that the Bare-Metal backup was restored to a VM and you get the "STOP: 0x0000007B".

1. Navigate to the .vmx of the Windows Server 2008 R2 VM.
2. Open the .vmx file by Notepad.
3. Make sure the .vmx file includes "scsi0.virtualDev = "lsisas1068"".


4. Close the .vmx file.
5. Insert Windows Server 2008 R2 DVD.
6. Boot from DVD-Rom.
7. On "Install Windows" screen, click "Next".


8. Click "Repair your computer".
 

9. Select "Use recovery tools that can help fix problems starting Windows. Select an operating system to repair.".


10. Click "Next".
11. Select "Command Prompt".


12. Perform "regedit" to start "Registry Editor".


13. Select "HKEY_LOCAL_MACHINE".
14. On the menu, click "File > Load Hive".


15. Navigate to "D:\Windows\System32\Config\SYSTEM".


Remark: Note that the restored Windows may be restored to another drive letter.

16. Click "Open".
17. Under "Key Name", type "Recovery".


18. Click "OK".
19. Navigate to "HKEY_LOCAL_MACHINE\Recovery\ControlSet001\services\LSI_SAS".
20. Double-click "Start".
21. Change the "Value data" to "0".


22. Click "OK".


23. Navigate to "HKEY_LOCAL_MACHINE\Recovery".
24. On the menu, click "File > Unload Hive".


25. On "Confirm Unload Hive" window, click "Yes".


26. Close "Registry Editor".
27. On "System Recovery Options", click "Restart".


After restarted, the Windows Server 2008 R2 can boot up in a VM of VMware workstation.
 
 
This posting is provided “AS IS” with no warranties, and confers no rights!