Showing posts with label Hyper-V Server 2012 R2. Show all posts

Saturday, December 17, 2016

Fail to register another vault for a Hyper-V server

Scenario
The previous Site Recovery vault was deleted form the Azure and the Hyper-V was uninstalled the Azure Site Recovery Provider. When you register a Hyper-V server with an Azure Site Recovery vault, you get the following error message.

The server is already registered in vault. Either select the registration key associated with this vault, or unregister the server from and then register it with a different vault. Learn more on how to unregister the server from the previous vault: http://aka.ms/unregisterservers.


Cause
The previous Azure Site Recovery Vault is still remained in the registry of the Hyper-V Server

Solution
1. Cancel the installation.
2. Launch Registry Editor and navigate to HKEY_LOCAL_MACHINE\SOFTWARE\Microsoft\Azure Site Recovery.
3. Delete the Azure Site Recovery key.


4. Uninstall and reinstall the provider and agent setup.


Reference:

This posting is provided “AS IS” with no warranties, and confers no rights!

Wednesday, January 27, 2016

Recommended hotfixes for Windows Server 2012 R2 Hyper-V from Microsoft KBs

Microsoft listed the recommended hotfixes for Windows Server 2012 R2 Hyper-V environment on some KBs. These hotfixes are related to Hyper-V, Failover Clustering and Hyper-V Network Virtualization on Windows Server 2012 R2. These hotfixes aren't downloaded from Windows Update of Windows Server 2012 R2. Administrators have to request and download it manually. However, some hotfixes may not be suitable for your Hyper-V hosts because some features that you don't implement. Please go to the following web sites to check what you need and then apply it to your Hyper-V hosts. And, these hotfixes are updated irregularly.

Recommended hotfixes, updates, and known solutions for Windows Server 2012 R2 Hyper-V environments

Recommended hotfixed and updates for Windows Server 2012 R2-based failover clusters

Recommended hotfixes, updates, and known solutions for Windows Server 2012 R2 Hyper-V Network Virtualization (HNV) environments

This posting is provided “AS IS” with no warranties, and confers no rights!

Sunday, January 11, 2015

Allow and Deny network traffic by using Extended Port Access Control List on Hyper-V switch

In Windows Server 2012, Microsoft added a feature on a Hyper-V switch which is Port Access Control Lists (ACLs) to configure network traffic on virtual machines. To configure Port Access Control Lists (ACLs), we have to perform PowerShell cmdlets to configure it. The cmdlets are Get-VMNetworkAdapterAclAdd-VMNetworkAdapterAcl and Remove-VMNetworkAdapterAcl. In Windows Server 2012 version, there are only few options for administrators to configure it. we can allow or deny inbound, outbound or both traffic to virtual machines which are based on MAC or IP address but we cannot specific both local IP or remote IP address in the same rule. If there are multi-NICs in virtual machines, we can specific the vNIC of virtual machines to apply the rule. There is no option to configure rules which are based on a specific port or protocol for virtual machines.


One important thing of Port Access Control Lists is "Action: Allow" override "Action: Deny".

In Windows Server 2012 R2, added another feature to Hyper-V switch which is Extended Port Access Control Lists (ACLs). Microsoft added more detailed options into other cmdlets, Get-VMNetworkAdapterExtendedAclAdd-VMNetworkAdapterExtendedAcl and Remove-VMNetworkAdapterExtendedAcl to let us to configure the ACL rules for virtual machines. We can add parameter of Add-VMnetworkAdapterExtendedAcl to allow or deny traffic of specific ports, protocol, VLAN and so on for vNIC or virtual machines. Add-VNnetworkAdapterExtendedAcl came with weight parameter to let us to determine the order of the rule. The rule with higher integer weight will be applied first. There is an option, stateful ACL rules.


Remark: You cannot use same integer weight to apply 2 same direction rules.


Reference from Microsoft
A stateful rule filters packets based on five attributes in a packet - Source IP, Destination IP, Protocol, Source Port, and Destination Port.

How about Windows Server Technical Preview (vNext)?
There is no information about Extended Port Access Control Lists for Windows Server Technical Preview at this moment. In the Nov of 2014, Microsoft announced Azure Network Security Groups for Microsoft Azure. We can create a group and and then add virtual machines to the group to apply network rules like Extended Port Access Control Lists in Microsoft Azure. However, there is a limitation of this feature is the network traffic running in virtual network (vNet). In my opinion, it's enhanced Extended Port Access Control Lists which is available for Microsoft Azure. Microsoft might consider adding this feature on the next version of Windows Server.

More information
Create Security Policies with Extended Port Access Control Lists for Windows Server 2012 R2

Network Security Groups

About Network Security Groups

This posting is provided “AS IS” with no warranties, and confers no rights!

Saturday, December 6, 2014

Veeam Task Manager for Hyper-V

Veeam Task Manager is a small tool to let you know the CPU and Memory usage of virtual machines and a Hyper-V host. It supports to monitor Windows Server 2012, Windows Server 2012 R2, Hyper-V Server 2012 and Hyper-V Server 2012 R2.


The tool can be installed on Windows 7, Windows 8, Windows 8.1, Windows Server 2012 and Windows Server 2012 R2.

To monitor the remote Hyper-V host, make sure the firewall TCP port 445 of a Hyper-V host is opened and the user account is under local administrator or Performance Log Users group of remote Hyper-V hosts.

To download this application, please go to the following web site:

For more information, please read a blog post from Ben Armstrong.

This posting is provided “AS IS” with no warranties, and confers no rights!

Sunday, September 14, 2014

VMware to Hyper-V Migration Microsoft Virtual Academy course

A new Microsoft Virtual Academy course, VMware to Hyper-V Migration, is available on Microsoft Virtual Academy website. This course is hosted by Matt McSpirit, Microsoft Senior Technical Product Marketing Manager. Matt talked about solutions which are provided by Microsoft to migrate virtual machines from VMware to Hyper-V platform and then he gave demonstrations of these tools. After that, he invited other partners to talk and give demonstrations of their tools to migrate virtual machines from VMware to Hyper-V platform.

If you are looking for solutions to migrate virtual machines from VMware to Hyper-V platform, don't miss this course.

VMware to Hyper-V Migration
 
This posting is provided “AS IS” with no warranties, and confers no rights!

Wednesday, June 18, 2014

Directly copy files from a Hyper-V host to a virtual machine on Windows Server 2012 R2 and Windows 8.1

In Windows Server 2012 R2 and Windows 8.1 with Hyper-V role, administrators can perform "Copy-VMFile" cmdlet to directly copy files from a Hyper-V host which is installed Windows Server 2012 or Windows 8.1 with Hyper-V role to a virtual machine without using a network connection. To copy files to a virtual machine, make sure virtual machines have been installed latest "Integration Services". After that, enable "Guest services" in a virtual machine.


By default, "Guest services" isn't enabled in a virtual machine. Administrators have to enable it by GUI or PowerShell before copying a file. To enable it by PowerShell, administrators can perform "Get-VMIntegrationService -VMName <Virtual Machine Name> -Name "Guest Service Interface" | Enable-VMIntegrationService -Passthru" cmdlet to enable "Guest services".


Then, Administrators can perform "Copy-VMFile -VMName <Virtual Machine Name> -SourcePath <The file path of a Hyper-Host> -DestinationPath <The destination file path of a virtual machine> -CreateFullPath -FileSource Host" to create and copy a file to a virtual machine.


Remark: "Copy-VMFile" can only copy 1 file per each time.

Administrators can use "Copy-VMFile GUI" which was written by seji to copy files from a Hyper-V host to a virtual machine. "Copy-VMFile GUI" is based on "Copy-VMFile" but it can add multiple files to copy to a virtual machine.


When all files have been copied to a virtual machine, administrators  should to disable the "Guest Services". To disable the service by PowerShell, administrators can perform "Get-VMIntegrationService -VMName <Virtual Machine Name> -Name "Guest Service Interface" | Disable-VMIntegrationService -Passthru" to disable it.


More information


This posting is provided “AS IS” with no warranties, and confers no rights!

Tuesday, April 22, 2014

Enabling virtual receive-side scaling (vRSS) in Windows Server 2012 R2 virtual machine

In Windows Server 2012 R2, Microsoft added the receive-side scaling function in a Microsoft Hyper-V Network Adapter of a virtual machine. This function is called virtual receive-side scaling by Microsoft. By default, receive-side scaling in a virtual machine is disabled.  


Before using virtual receive-side scaling, the network throughput of a virtual machine is limited by a single virtual processor because a single virtual processor isn't enough processing power to handle the network throughput larger than 5Gb. Microsoft improved virtual machine queue to work with virtual receive-side scaling in Windows Server 2012 R2. The network traffic of a virtual machine which is enabled vRSS will spread to multiple VMQ. It can improve the network performance of a virtual machine.

To use virtual receive-side scaling, administrators make sure the following items are supported.

  • Operating system of a virtual machine is Windows Server 2012 R2 or Windows 8.1
  • The Hyper-V host is Windows Server 2012 R2
  • Windows Server 2012 R2 integration components is installed in a virtual machine
  • A physical network adapter supports Virtual Machine Queue (VMQ)
To enable virtual receive-side scaling, administrators can enable it by "Device Manager" or "PowerShell" in a virtual machine which is installed Windows Server 2012 R2.

Device Manager 
1. On a virtual machine, log in as administrator.
2. Click "Start", enter "device manager".


3. Expand "Network adapters".
4. Right-click "Microsoft Hyper-V Network Adapter", select "Properties".


5. Select "Advanced" tab.
6. Select "Receive Side Scaling".
7. Next to "Value", select "Enabled".


8. Click "OK".

PowerShell
1. On a virtual machine, log in as administrator.
2. Launch "PowerShell" as administrator.
3. Perform "Set-NetAdapterRss -Name <NIC Name> -Enabled $True" to enable RSS on a network adapter.


Remark: Administrators also can assign how many virtual processors for virtual receive-side scaling (vRSS). For more information, please read Receive Side Scaling (RSS) in Windows Server 2012 and Windows Server 2012 R2.

To disable virtual receive-side scaling, administrators can perform "Set-NetAdapterRss -Name <NIC Name> -Enabled $False".


More information:

This posting is provided “AS IS” with no warranties, and confers no rights!

Sunday, April 13, 2014

Converged networking on Windows Server 2012 and Windows Server 2012 R2 with Hyper-V role

On Windows Server 2008 R2 with Hyper-V role for cluster environment, administrators dedicate each network card to each network function like live migration, storage, management OS, virtual machine and so on. Starting from Windows Server 2012, Microsoft extended the Hyper-V virtual switch features and then added new virtual network adapter concept for a Hyper-V host which can also apply to cluster environment.

What's the benefit to use converged network in a Hyper-V host?

Nowadays, administrators decide to use 2 x 10Gb NICs for a Hyper-V host to replace a lot of 1Gb NICs. Using the old concept, 2 x 10Gb NICs are not enough to cover all kinds of network services which were mentioned. Administrators may need to add additional NICs for each network service. This case increased the additional hardware cost and administrators cannot utilize add the bandwidth of this 2 x 10Gb NICs. Plus, there is no high availability for each network service on this Hyper-V host.

Using converged network concept in Windows Server 2012 or Windows Server 2012 R2, administrators can form a NIC teaming by Windows Server 2012 built-in tool to make 2 x 10Gb NICs to be high availability. After that, administrators can create a Hyper-V switch which is linked to the teamed NICs. Then, administrators can create virtual NICs for each network service on a Hyper-V host. All virtual NICs traffic will route through the Hyper-V switch to a physical network. As a result, all network services are high availability and utilize all NICs.


This image from What's New in Hyper-V Virtual Switch in Windows Server 2012

Staring from Windows Server 2012, Hyper-V virtual switches support  many new features like Quality of Service (QoS), Multiple virtual NICs, Port Access Control List (ACLs) and so on. However, there is no GUI to configure virtual NICs and QoS which is related Hyper-V virtual switches and virtual NICs. Administrators need to perform PowerShell cmdlets to configure it.

To configure converged network in Windows Server 2012 or Windows Server 2012 R2, administrators need to notice the following things.

NICs Teaming
According to "Software-Defined Networking with Windows Server and System Center Jump Start" series, Microsoft suggested which teaming mode should be applied to the Hyper-V host to get the best performance.

For Windows Server 2012
  • Switch Independent mode: Hyper-V Port
  • Switch Dependent mode: Address Hash

This image from Scaling SDN - Network Performance and Reliability improvements with Win Svr 2012 R2

For Windows Server 2012 R2
  • Switch Independent mode: Dynamic
  • Switch Dependent mode: Dynamic

This image from Scaling SDN - Network Performance and Reliability improvements with Win Svr 2012 R2

Remark: Dynamic algorithm only supports on Windows Server 2012 R2.

Remark: Don't form a team for NICs which are dedicated to Remote Direct Memory Access (RDMA) or SR-IOV features because the data is delivered directly to the NIC without passing it through the networking stack (in the host OS in the case of virtualization). Therefore, it is not possible for the team to look at or redirect the data to another path in the team. 

Quote from Windows Server 2012 R2 NIC Teaming (LBFO) Deployment and Management

References:

To configure NIC teaming on Windows Server 2012 or Windows Server 2012 R2, please read Configuring NIC teaming in Windows Server 2012 or later for your information. 

Receive Side Scaling (RSS) and Virtual Machine Queue (VMQ)
Receive Side Scaling (RSS) and Virtual Machine Queue (VMQ) is a similar network function. Both of these features distribute network receive traffic to multiple processor cores. By default, when a NIC or NIC team is linked to a virtual switch, the RSS feature is disabled on the NIC or NIC team. However, administrators should be aware that If there are different NICs which are assigned to RSS and VMQ, administrators need to configure the processors assignment for RSS and VMQ. Don't share the same processor for both features because it affects the performance of CPU and network.

By default, VMQ hasn't enabled on 1Gb NICs. To enable VMQ for 1Gb NICs, launch "Registry Editor" and then navigate to
"HKEY_LOCAL_MACHINES\SYSTEM\CurrentControlSet\Services\VMSMP\Parameters\" to update "BelowTenGigVmqEnables" value to 1.


Remark: Some NIC vendors control "BelowTenGigVmqEnables" value by their own panel.


To configure the processors assignment for RSS and VMQ, administrators can perform "Set-NetAdapterRss" and "Set-NetAdapterVmq" to change the processors assignment.


There are 8 logical cores in the demo computer which I perform PowerShell cmdlets

Perform "Set-NetAdapterRss -Name <NIC Name> -BaseProcessorNumer 0 -MaxProcessorNumber 3" to assign logical CPU from 1 to 4 cores for a NIC which is used to RSS feature.

Perform "Set-NetAdapterVmq -Name < NICName> -BaseProcessorNumber 4 -MaxProcesorNumber 7" to assign logical CPU from 5 to 8 cores for a NIC which is used to VMQ feature.


Both features, RSS and VMQ, don't share the same processors.

Administrators can perform "Get-NetAdapterRss" to check RSS status of NICs.


However, Ethernet is linked to a virtual switch. The RSS feature should be enabled. To check the RSS, I performed "Get-NetAdapter | Ft Name, IfIndex - AutoSize" to check the name and interface index of NICs. After that, I performed "Get-SmbServerNetworkInterface | FT InterfaceIndex, RSSCapable -AutoSize" to check which NICs are RSS capable.


Now, we can confirm that the RSS feature has been enabled on "Ethernet 6" only.

If NICs don't support VMQ feature, there is no result when administrators perform "Get-NetAdapterVmq".


To confirm VMQ feature is enabled, administrators can perform "Get-NetAdapterVmqQueue" to verify it. If there is no result, VMQ feature isn't enabled on this adapter.


References:
Receive Side Scaling (RSS) in Windows Server 2012 and Windows Server 2012 R2

VMQ Deep Dive, 1 of 3

VMQ Deep Dive, 2 of 3

VMQ Deep Dive, 3 of 3

Network Isolation and switches
To isolate different networks, administrators may need to use VLAN for isolation. The vNICs support VLAN function by performing PowerShell cmdlet, Set-VMNetworkAdapterVlan. Administrators need to make sure that physical switches support 802.1q VLAN and then configure physical switch ports to trunk mode to allow all VLAN traffic.

Reference:
VLAN Tricks with NICs - Teaming & Hyper-V in Windows Server 2012

QoS
Guidelines for using Minimum Bandwidth

  • Keep the sum of the weights near or under 100. The larger the value for weight, the higher rounding error or quantization error there is when Qos Packet Scheduler partitions the bandwidth among workloads. The best example to illustrate this guidance is if there are 20 VMs that you want to share the network bandwidth, rather than assigning a weight of 10 to each of them (in which case the sum would be 200), assign each VM a weight 1.
  • Assign a relatively large weight to critical workloads even if they don't require that percentage of bandwidth. The best example to illustrate this guidance is to think of Management and Cluster heartbeat traffic on a computer that is running the Hyper-V server role. They rarely require more than 1 or 2 percent of bandwidth over a 10GbE NIC. But they're critical. So instead of assigning to each of them a weight of 1 or 2, you should assign each a weight of 5 or more.
  • Gap the weight assignment to differentiate the level of service to be provided. In other words, when assigning weight values to VMs, do not use consecutive numbers, such as 1,2 and 3. For example, if you have VMs named Gold, Silver, and Bronze on the same Hyper-V Virtual Switch, assign them a respective weight of 5 for Gold, 3 for ilver, and 1 for Bronze - rather than a weight of 3, 2 and 1, respectively.
  • Ensure that traffic is not specifically filtered out is also accounted for with a weight assignment. For example, review the configuration 2 NICs without NIC Teaming, where Storage, Live Migration, and Cluster are filtered out with a workload-specific filter. In addition, the rest of the network traffic is grouped with a wild card filter as one single flow that has a weight assignment.

For some cases, Using weight for minimum bandwidth is better than absolute number.

Case 1 - Live Migration
For example, consider a VM that is configured to have a Minimum Bandwidth of 500 MBPS. In the Live Migration case, if a destination computer running Hyper-V doesn't have 500 MBPS spare bandwidth to satisfy this VM, Live Migration failes because the service is disrupted. If Minimum Bandwidth is specified by weight, this problem does not occur because weight specifies a percentage of bandwidth rather than a specific number of BPS that re required for the traffic. Live-migrating a VM with a Minimum Bandwidth weight of 3, for example, only increase the sum of the weights by 3 on the destination computer that is running Hyper-V. In this configuration, the Live Migration service does not fail.

Case 2 - NIC Teaming
When you configure Minimum Bandwidth in absolute numbers, there is another level of complexity when the deployment involves NIC Teaming. For example, if a Hyper-V switch is bound to a two 1Gb NIC team, and then NIC team appears to provide 2 Gbps available bandwidth. However, you cannot allocate more than 1 Gbps bandwidth to VMs. If VMs were configured with more bandwidth, they wouldn't be able to satisfy the requirements of those VMs in the event of a NIC failure.


This image from QoS Minimum Bandwidth Best Practices

In contrast, If Minimum Bandwidth were specified by weight in the above configuration, there would be no issue because all traffic would be hashed to the remaining NIC, and bandwidth for each VM would be partitioned proportionally according t its weight. This is another reason that for most deployments you should use the weight mode when configuring Minimum Bandwidth.

Quote from Qos Minimum Bandwidth Best Practices

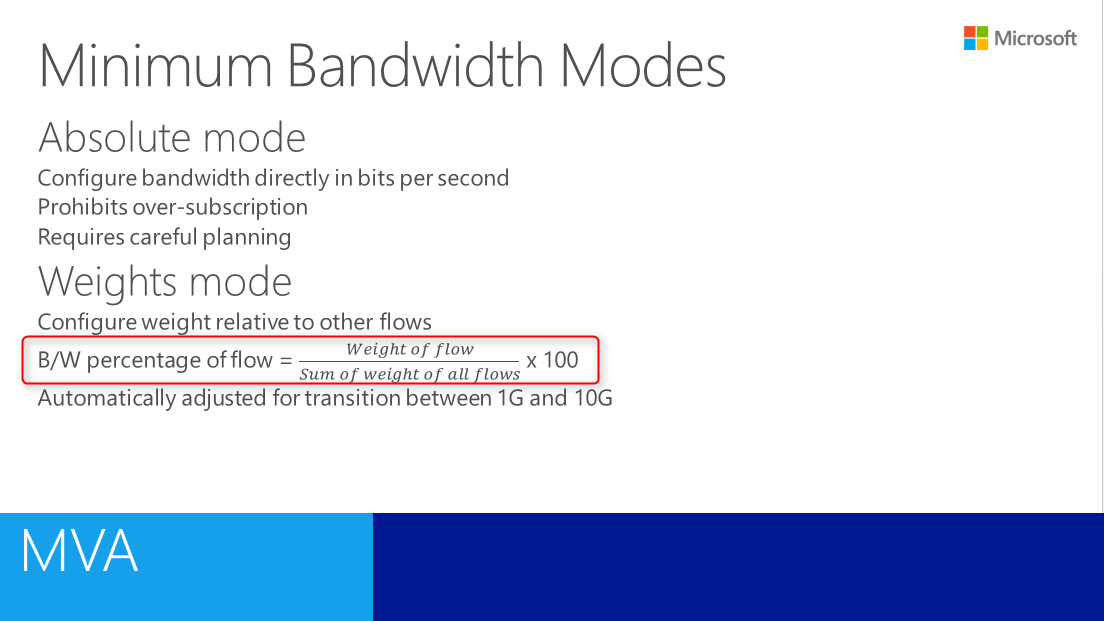
What is the formula to calculate the weight of Minimum bandwidth?

According to "Introduction to Hyper-V Jump Start" series, the formula is the following.


This image from Hyper-V Networking

Remark: Once a Hyper-V virtual switch is created in a mode (weight, absolute bandwidth) it can't be changed.

Virtual machines can't migrate between systems where one is weights-based and the other is absolute.

Reference:
Converged Networking for Windows Server 2012 R2 Hyper-V

Lab environment

  • 1 physical server named HV03 with 4 x Intel 1Gb NICs
  • All NICs connected to a single physical switch
  • HV03 is installed Windows Server 2012 R2 Datacenter
  • HV03 is installed Hyper-V role
Lab
All configuration will be performed by local administrator of HV03.

1. On HV03, log in as local administrator.
2. Launch "PowerShell" as administrator.
3. Perform "New-NetLbfotTeam "NICTeam01" -TeamMembers "Ethernet", "Ethernet 2", "Ethernet 3", "Ethernet 4" -TeamingMode SwitchIndependent -TeamNicName "NICTeam01" -LoadBalancingAlgorithm Dynamic -Confirm:$False" to create a NIC teaming named "NICTeam01".


4. Perform "New-VMSwitch -Name HVSwitch01 -AllowManagementOS $false -NetAdapterName NICTeam01 -MinimumBandwidthMode weight" to create a new Hyper-V virtual switch and linked to a NIC teaming. The QoS mode of this switch is weight and the VM switch doesn't share the NIC with management operating system.


5. Perform "Set-VMSwitch -Name HVSwitch01 -DefaultFlowMinimumBandwidthWeight 40" to assign default minimum bandwidth for the virtual switch more than configure QoS of bandwidth to an individual virtual machine.


6. Perform 
Add-VMNetworkAdapter -ManagementOS -Name "Management" -SwitchName "HVSwitch01"
Add-VMNetworkAdapter -ManagementOS -Name "Cluster" -SwitchName "HVSwitch01"
Add-VMNetworkAdapter -ManagementOS -Name "LM" -SwitchName "HVSwitch01" to create virtual NICs for management OS, Cluster and Live Migration.


7. Perform 
Set-VMNetworkAdapterVlan -ManagementOS -VMNetworkAdapterName "Management" -Access -VlanId 10"
Set-VMNetworkAdapterVlan -ManagementOS -VMNetworkAdapterName "Cluster" -Access -VlanId 11"
Set-VMNetworkAdapterVlan -ManagementOS -VMNetworkAdapterName "LM" -Access -VlanId 12" to configure the port mode and VLAN for the virtual NICs.


8. Perform 
Set-VMNetworkAdapter -ManagementOS -Name "Management" -MinimumBandwidthWeight 10
Set-VMNetworkAdapter -ManagementOS -Name "Cluster" -MinimumBandwidthWeight 10
Set-VMNetworkAdapter -ManagementOS -Name "LM" -MinimumBandwidthWeight 40 to configure minimum bandwidth weight for the virtual NICs.


After that, administrators can perform "New-NetIPAddress" to assign IP addresses for the virtual NICs.

As a result, virtual machines share 1.6Gb of 4Gb, Live migration traffic shares 1.6Gb of 4Gb, Management OS and Cluster share share 400Mb for each virtual NIC.

Remark: Perform "Get-VMNetworkAdapter -ManagementOS | FT Name, BandwidthPercentage -AutoSize" to verify the bandwidth percentage.


Based on your production environment, administrators may create virtual NICs for Storage, SMB and Hyper-V replicate and configure minimum bandwidth for these virtual NICs.

Remark: The minimum bandwidth weight is not limited to 100. However, it's suggested keeping the sum of weight near or under 100 by Microsoft.

More information


This posting is provided “AS IS” with no warranties, and confers no rights!

Tuesday, March 11, 2014

Enabling network virtualization on a logical network in System Center Virtual Machine Manager 2012 R2

Started at System Center Virtual Machine Manager 2012, administrators can configure Hyper-V network virtualization for Hyper-V Server 2012, Hyper-V Server 2012 R2, Windows Server 2012 with Hyper-V and Windows Server 2012 R2 with Hyper-V in System Center Virtual Machine Manager 2012.

In System Center Virtual Machine Manager 2012 R2, the option is changed. When administrators create a logical network, there is an option in "Create Logical Network Wizard".


Administrators need to check box, Allow new VM networks created on this logical network to use network virtualization, for using network virtualization when creating a logical network or check the same option in a logical network properties.


If there is no logical network which is enabled the above option, when administrators create a VM network, there is no option to configure network virtualization.


If yes, administrators can find the option to configure network virtualization.


This posting is provided “AS IS” with no warranties, and confers no rights!

Saturday, March 1, 2014

Managing Hyper-V dynamic MAC address pool

By default, the default value of dynamic MAC addresses is 256 in all versions of Hyper-V servers. 

How come the default is 256?

According to KB2804678, Hyper-V generates the MAC address by the following algorithm.
  • The first three octets (aa-bb-cc) are Microsoft's IEEE organizationally Unique Identifier, 00:15:5D (which is common on all Hyper-V hosts).
  • The next two octets (dd-ee) are derived from the last two octets of the server's IP address.
  • The last octet (ff) is automatically generated from the range 0x0 - 0xFF.
Because the last octet is an 8-bit value, there is a default limit of 256 possible MAC addresses.

1. To increase the MAC address pool, click "Virtual Switch Manager" in "Hyper-V Manager".


2. Next to "MAC Address Range".


Administrators can modify the MAC address pool from here.

3. Or, Administrators can assign a static MAC address for a virtual machine in Network Adapter.


More information:

This posting is provided “AS IS” with no warranties, and confers no rights!